ATAS (Amazing Task and Assignment System) Developer Guide
By: Team M16-1 Since: Jan 2020 License: MIT
Table of Contents
- Setting up
- Design
- Implementation
- Testing
- DevOps
- Appendices
1. Setting up
This section will guide you on how to set up this project on your own computer.
1.1. Prerequisites
-
JDK 11 or above
-
IntelliJ IDE
1.2. Setting up the project
-
Fork this repository, and clone the fork to your computer
-
Open the IntelliJ IDE. If you are not in the welcome screen, click
File>Close Projectto close the existing project. -
Set up the correct JDK version for Gradle
-
Click
Configure>Project Defaults>Project Structure -
Click
New...and find the directory of the JDK
-
-
Click on
Import Project -
Locate and select the
build.gradlefile, then clickOK -
Click
Open as Project -
Click
OKto use the default settings provided
1.3. Verifying the Setup
-
In an IntelliJ terminal, run
gradlew build -
Move to the folder
build>libsand run:java -jar atas-2.0.0.jar-
To use ATAS, type a valid command into the terminal and press the enter key to run the command.
e.g. Typinghelpand pressing the enter key will show the available commands -
Some example commands you can try to get familiar with ATAS:
-
help: Lists the commands that ATAS supports. -
assignment n/Assignment One m/CS2113T d/01/02/20 1600 c/Important Assignment: Adds an assignment called Assignment One for the module CS2113T. This assignment is due on 1st February 2020 4pm and the comments for this assignment is that it is an Important Assignment. -
exit: Exits ATAS.
-
-
2. Design
This section will give a high-level overview of how various components in ATAS function and interact with each other.
2.1. Architecture
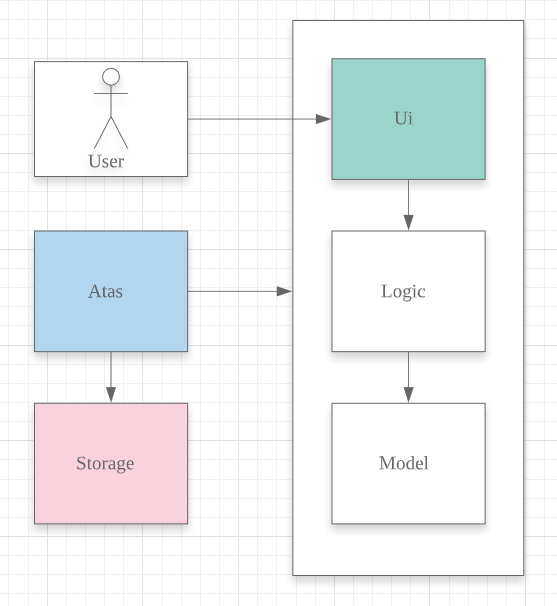
The architecture diagram above illustrates the high-level design of the ATAS application.
The Atas component contains all the other components in the application.
-
Ui: Reads user input, and shows the results of commands to the user -
Logic: Handles execution of user input commands -
Model: Stores the runtime data of the application -
Storage: Reads and stores data from a file stored on the user’s computer
The following sections will explain each component in greater detail.
2.2. UI Component
-
The
Uicomponent reads user input which represents a command. -
The
Uicomponent shows the result of the command to the user.
2.3. Logic Component
The Logic component comprises the Parser, Command, and CommandResult classes:
-
Parserwill interpret the user command and return the correspondingCommandobject. -
Command#execute()is called to run the command, returning aCommandResultobject. -
The
CommandResultobject will contain the output to be shown to the user.
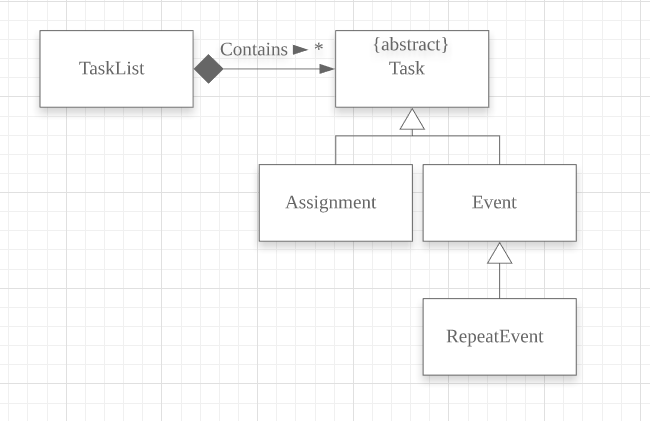
2.4. Model Component
The Model component contains the Task and TaskList classes, which store the user’s schedule.
2.5. Storage Component
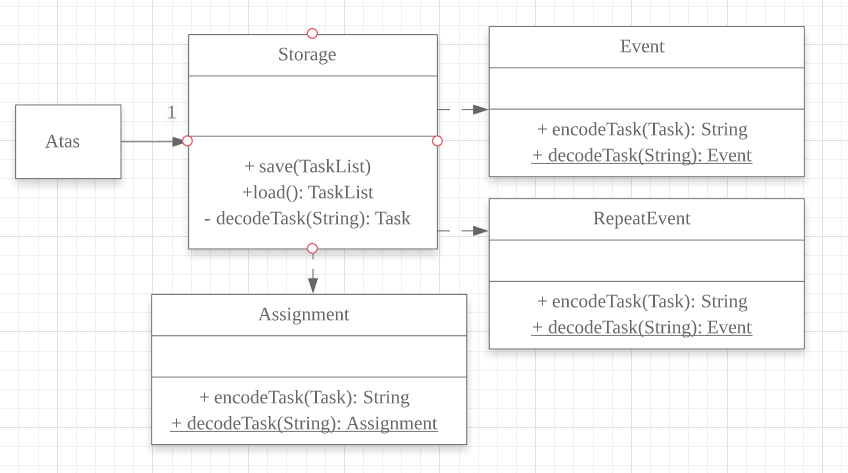
-
A
Storageobject is created by theAtasclass to handle the loading and saving ofTaskdata. -
The
load()method is used to read saved data from a local file into the current session of ATAS. -
The
save()method writes the current state of ATAS into the local save file using theTask#encodeTask()method.
2.6. Atas Component
The Atas component integrates all the aforementioned components to run the overall application logic.
The sequence diagram below shows how various components, broken down into the various classes, interact when the user enters a help command
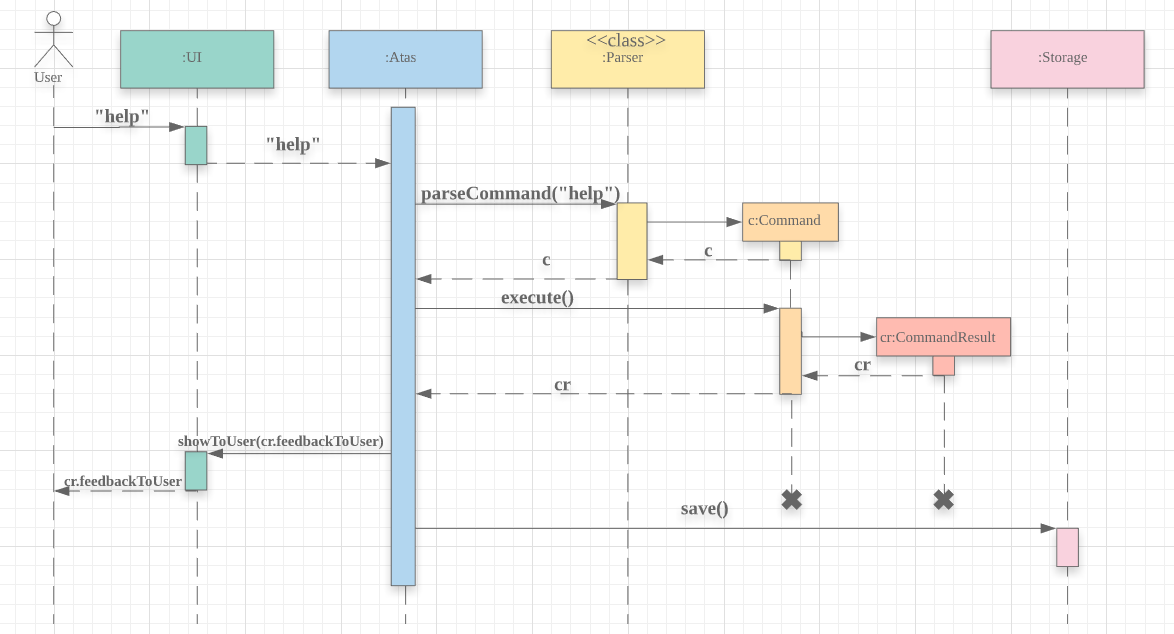
-
The
Uiclass is used to read user input. -
The
Parserclass is used to parse the user input string, returning aCommandobject. -
The
Command#execute()method is run, returning aCommandResultobject. -
The
Uiclass is used to show theCommandResultmessage to the user. -
The
Storageobject is used to save the new state of the application.
3. Implementation
This section will detail how some noteworthy features are implemented.
Note:
You will need to create tasks to use the features mentioned below.
Create anassignment:assignment n/[NAME] m/[MODULE] d/[DATE] [TIME] c/[COMMENTS]
Create anevent:event n/[NAME] l/[LOCATION] d/[DATE] [START_TIME] - [END_TIME] c/[COMMENTS]
Dates follow theDD/MM/YYformat, and times follow theHHmmformat.
For more information, please refer to the user guide.
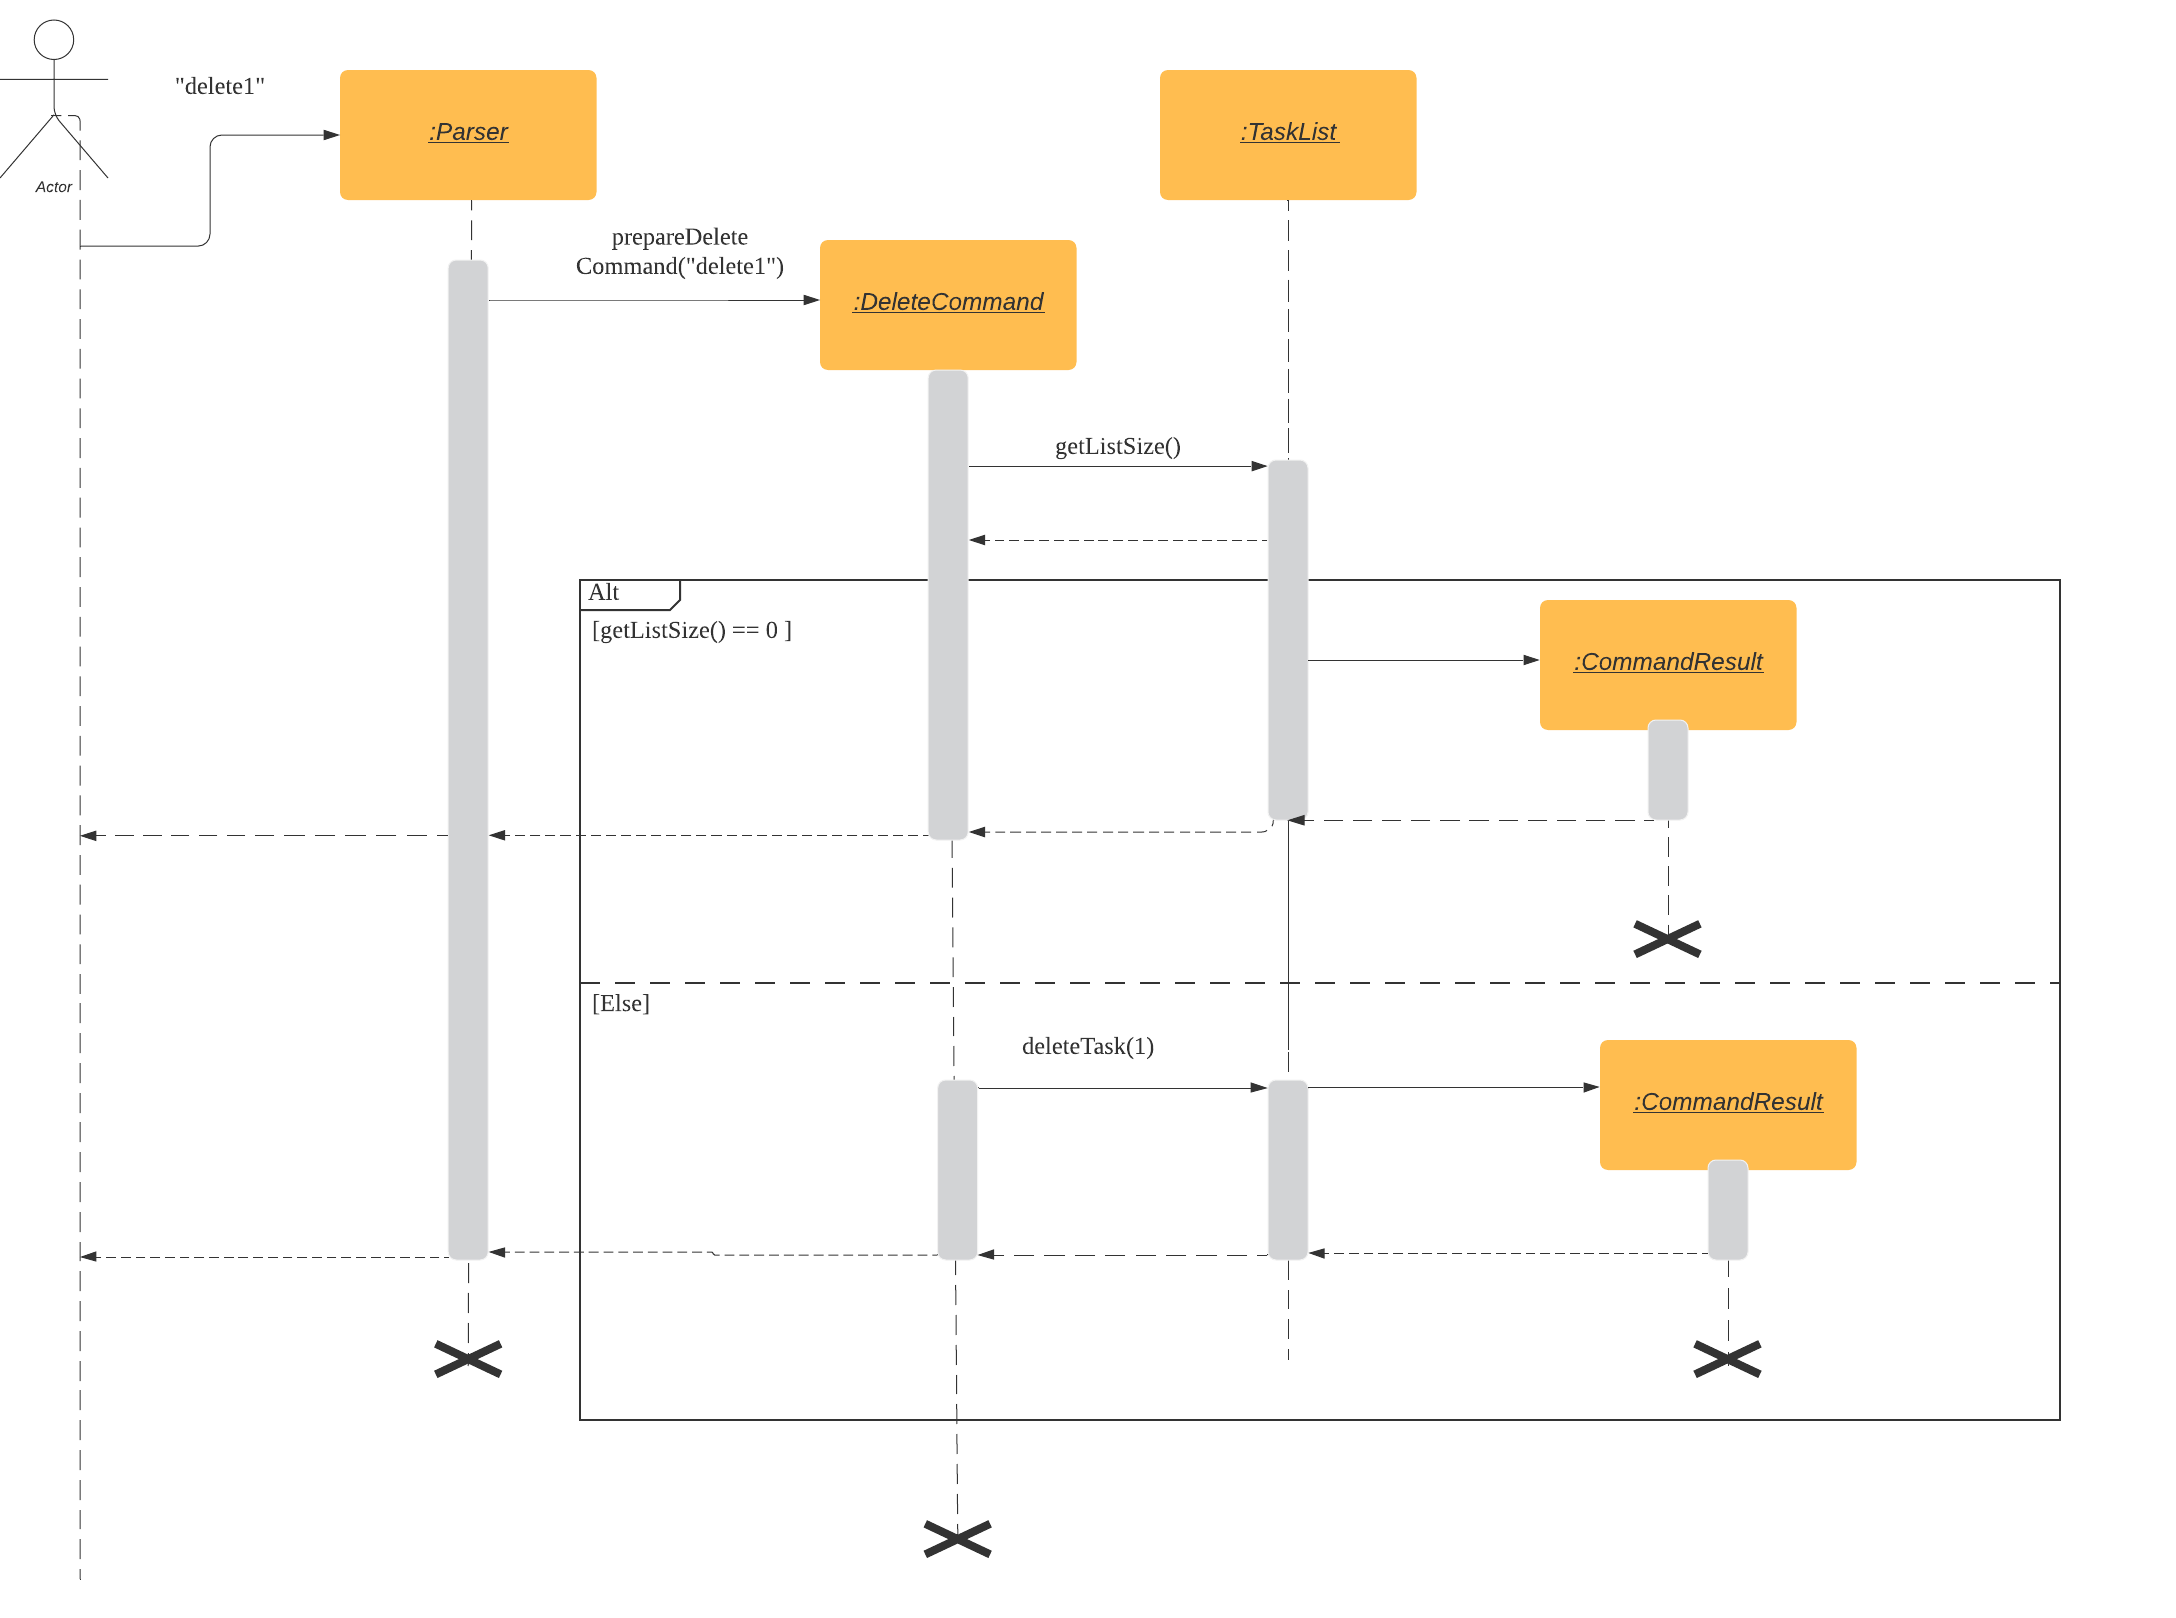
3.1. Delete Task Feature
3.1.1 Current Implementation
The DeleteCommand extends the Command class and initializes the delete index in its constructor. The delete index specifies the index of task that the user wants to delete.
Given below is an example usage and how the DeleteCommand mechanism behaves at each step:
Step 1
The user launches the app and retrieves the tasks which are saved under a local file using Storage.
Step 2
The user enters delete 1 into the command line. Method Parser#parseCommand() will be called to parse the command provided. It will obtain information to get delete index.
Warning:
IfIndexOutOfBoundsExceptionorNumberFormatExceptionis caught, a new instance ofIncorrectCommandclass will be called to print the respective error messages
Step 3
A new instance of DeleteCommand with delete index initialized will be created. The DeleteCommand#execute() will be called.
Step 4
The DeleteCommand#execute() method will do 2 things:
-
If there are no tasks in the existing task list, it will create a new instance of
CommandResultthat prints out an error message indicating an empty task list -
If there are tasks in the existing task list, the
DeleteCommandclass will call theTaskList#deleteTask()method to delete the task, based on the index. At the end of the execution, theDeleteCommandclass will create a new instance ofCommandResultclass that prints out the success message for task deletion.
The following sequence diagram summarizes how delete command operation works:
3.1.2. Design Considerations
-
Calling
remove()method inTaskList#deleteTask()instead of callingremove()method inDeleteCommand#execute()-
Pros: Easier implementation for other classes that requires the same use.
-
Cons: Additional functional call to
TaskList#deleteTaskis needed to delete a task from the task list, which may increase time complexity of delete operation. -
Rationale: We decided to implement it in such a way because we feel that the increase is time complexity is not going to have a big impact on our code as this app is developed to be used as a CLI. Furthermore, such implementation also allows us to keep all the related commands to the list of tasks within a class which keeps our code cleaner.
-
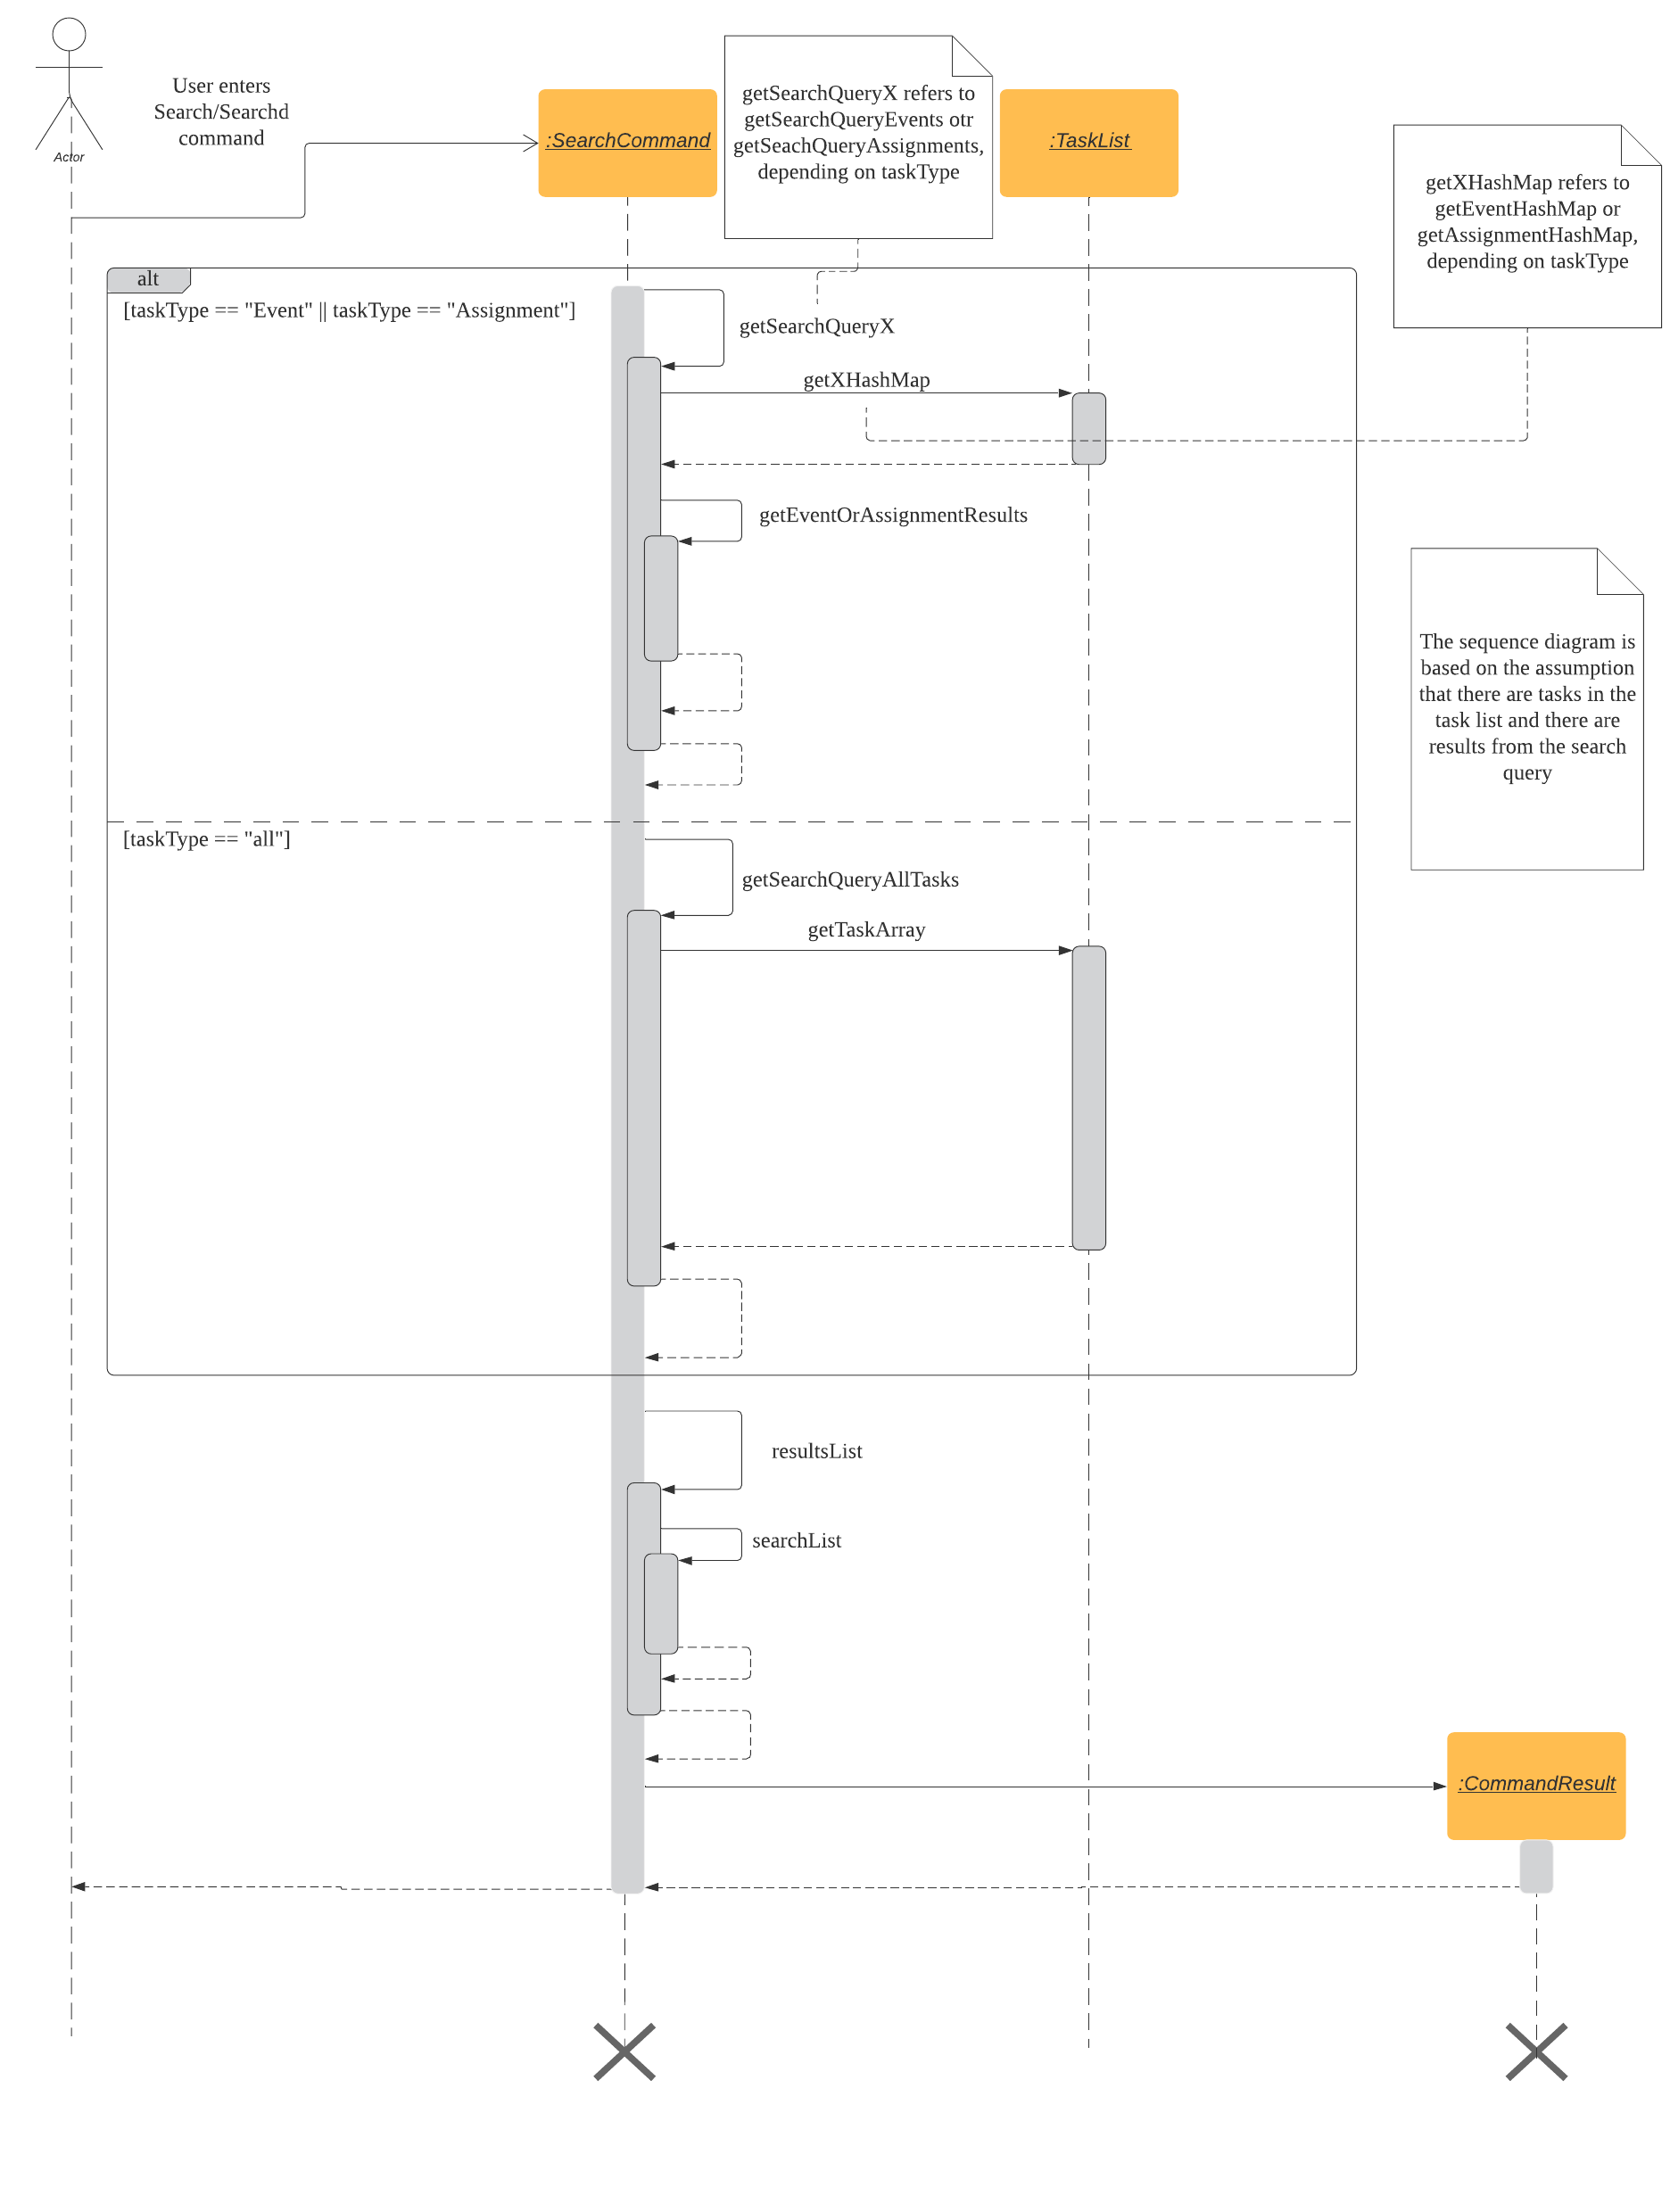
3.2. Search task feature
3.2.1 Current Implementation
The search task feature is currently implemented in SearchCommand class that inherits from the Command class.
SearchCommandinitializes thetaskType,searchParamanddatein its constructor.taskTyperefers to the type of task the user wants to search through.searchParamrefers to the search query that the user wants to find.daterefers to the date of the task that the user wants to find. It is set as a default value ofNULLif it is asearchcommand.SearchCommandclass containsCURRENT_COMMAND_WORDto store the command word used by the user(i.e.searchorsearchd)SearchCommandclass also containsCURRENT_COMMAND_USAGEto store the error messages for the respective commands.
Given below is an example usage of the search command:
Step 1
The user launches the app and retrieves the tasks that are saved under a local file using Storage.
Step 2
The user enters the input into the command line. Method Parser#parseCommand() will be called to parse the command
provided to obtain the taskType, searchParam and date .
Step 3
A new instance of SearchCommand with the taskType, searchParam and date will be created.
-
SearchCommandcontains an ArrayListstoreIndexto store the original index of the task containing the search query. -
Depending on the input that the user puts in, the
CURRENT_COMMAND_WORDin theSearchCommandclass will be updated to the user’s input command word and theCURRENT_COMMAND_USAGEin theSearchCommandclass will be updated accordingly.-
If there are no tasks in the existing task list, it will initialize a new
CommandResultclass that prints out an error message, indicating an empty task list -
Otherwise, If the
taskTypeis anassignmentorevent,SearchCommand#getSearchQueryAssignments()orSearchCommand#getSearchQueryEvents()will be called respectively.-
In the method,
TaskList#getEventsHashMap()andTaskList#getAssignmentsHashMap()will be called respectively, to obtain the original task list and the corresponding index. -
getEventOrAssignmentResultswill be called to obtain the results of the search query.SearchCommand#loopArrayNoDateEventsAssignments()orSearchCommand#loopArrayWithDateEventsAssignments()will be called to loop through the Linked HashMap to find the tasks matching the search query and date(if applicable) and add the original index to thestoreIndexand return an ArrayList containing the results.
-
-
Lastly, If
taskTypeis “all”,SearchCommand#getSearchQueryAllTasks()will be called.-
In the method, an ArrayList will be used to store the updated task list from
TaskList#getTaskArray() -
We will iterate through the ArrayList to find the tasks matching the search query and date(if applicable) and add the original index to the
storeIndexand return an ArrayList containing the results.
-
-
Step 4
The ArrayList containing the results from Step 3 will be parsed into SearchCommand#SearchList() to format the results into a String suitable
for printing out to the users.
Step 5
The String results from Step 5 will be parsed into SearchCommand#resultsList() to print out the results.
-
If there are no matching search query, a new instance of
CommandResultclass will be created to print out the error message, indicating no matching search query, -
Otherwise, a new
CommandResultclass will be created to print out the search results.
The following sequence diagram summarizes how the search and searchd command works :
3.2.2. Design Considerations:
-
Using Linked HashMap to store key-value pairs for
eventsandassignments-
Rationale: To maintain an ordering among the events and assignments that we iterate through so that there is no need to sort through the list again to restore the original ordering
-
Alternatives Considered:
-
Use a HashMap to store the key-value pairs
-
Pros: HashMap does not maintain a doubly-linked list running though all entries so there is less overhead as compared to a Linked HashMap, leading to better performance in terms of memory usage
-
Cons: HashMap does not maintain an iteration order so more sorting has to be done to restore the original order, which will incur additional time complexities
-
-
-
-
Creating a single class that implements both
SearchandSearchdfunctionalities.-
Rationale:
To create 2 separate commands so that users can filter their search query more easily and efficiently. -
Alternatives Considered:
-
Use 2 seperate classes for
SearchandSearchdseperately.-
Pros: Easier to implement as the implementation for the 2 commands can be implemented in 2 different classes.
-
Cons: There may be increased coupling as there is a need for the
Parserclass to reference both classes for the 2SearchandSearchdcommands respectively.
-
-
Create another method that implements
SearchdandSearchfunctionalities within theParserclass.-
Pros: Easier to implement.
-
Cons: Makes the code for
Parserunnecessarily long and less OOP, affecting the overall code quality
-
-
-
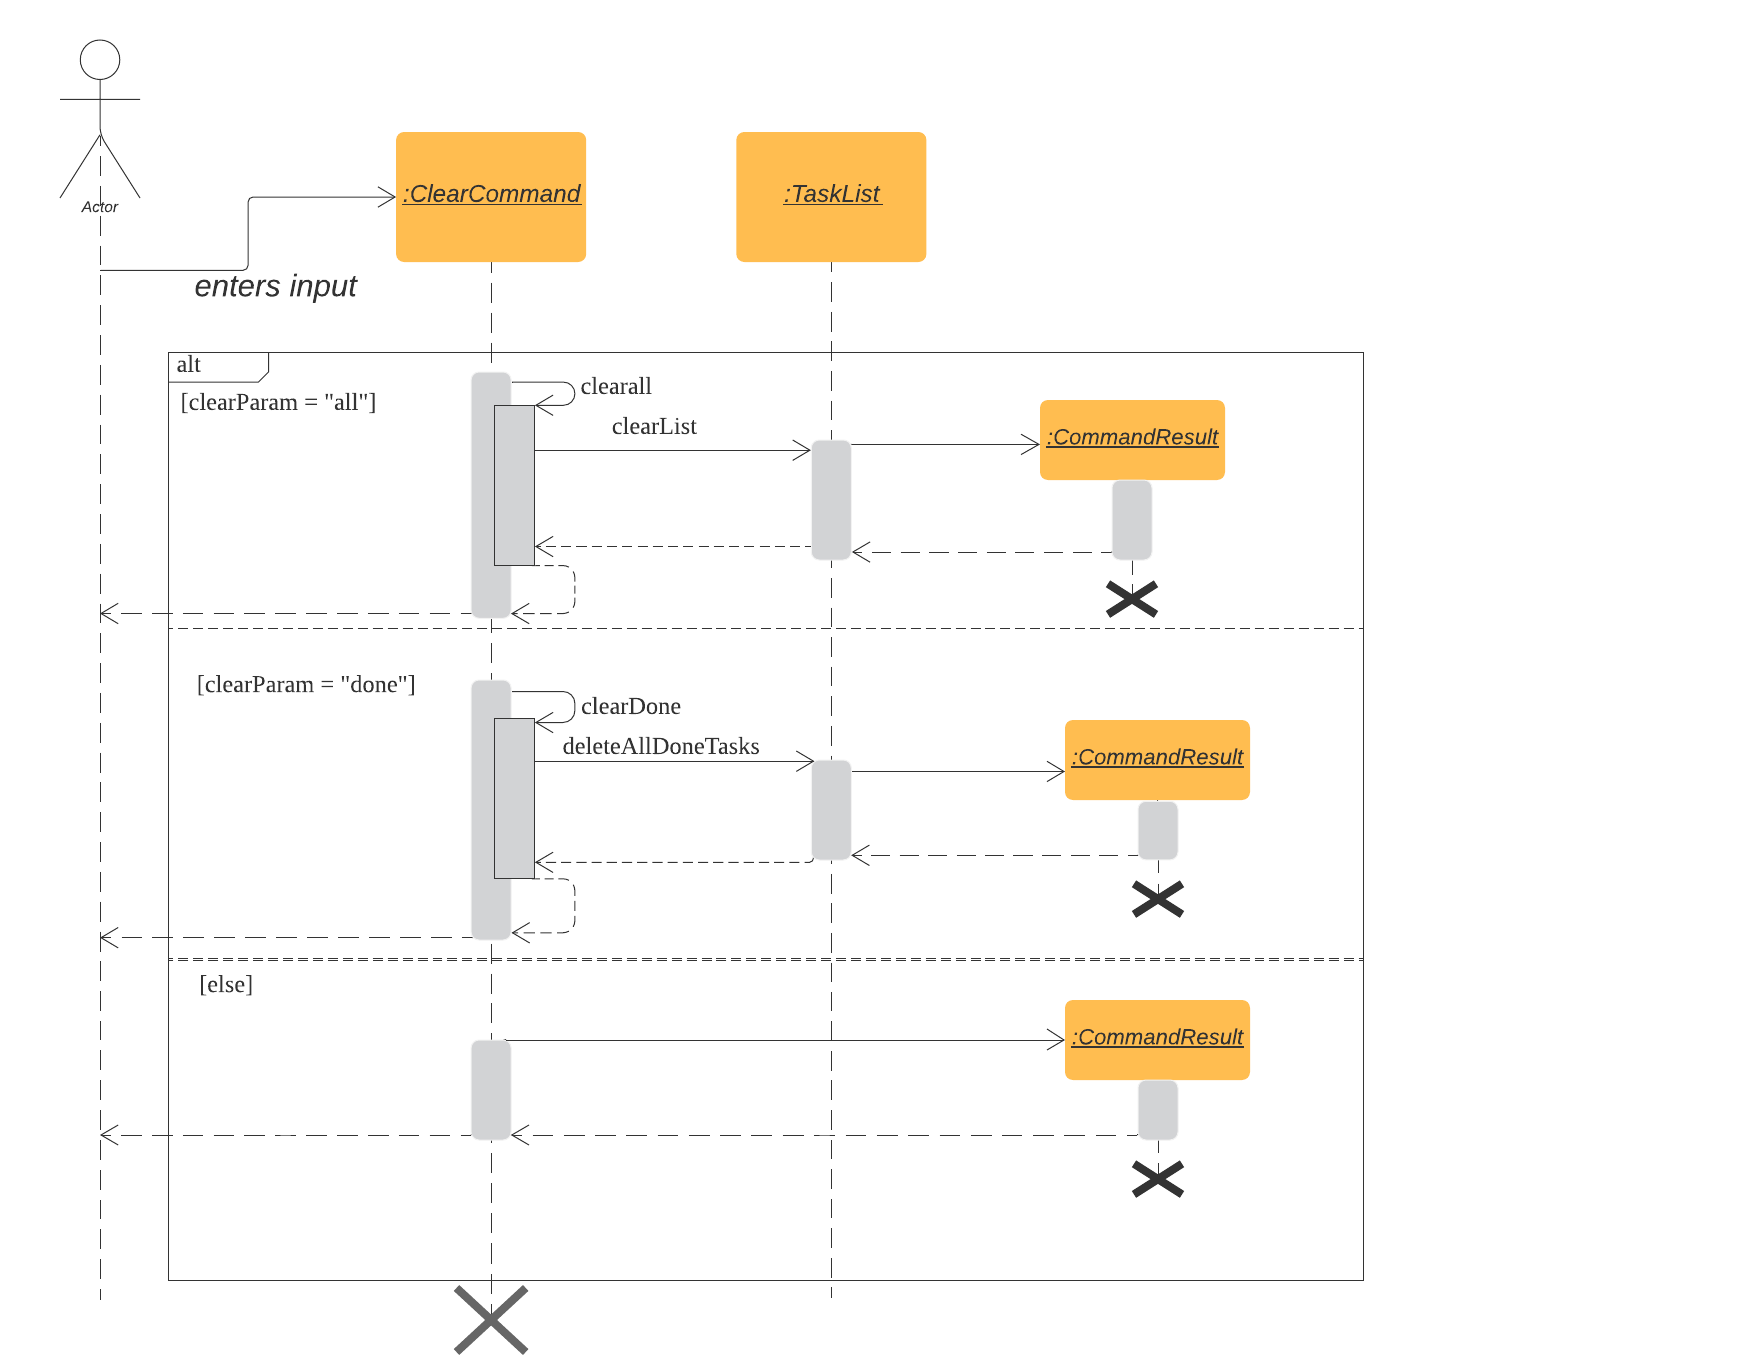
3.3. Clear Task feature
3.3.1. Current Implementation
The ClearCommand inherits from the Command class and initializes the clearParam to check which clear function has to be executed
Example 1: Given below is an example usage of the clear all command:
Step 1
The user launches the app and retrieves the tasks which are saved under a local file using Storage.
Step 2
The user enters clear all into the command line. Method Parser#parseCommand() will be called to parse the command provided.
Step 3
A new instance of ClearCommand with clearParam initialized will be created. The execute() method of DeleteCommand will then be called.
Step 4
The execute() method will then call the ClearCommand#clearAll().
-
If there are no tasks in the existing task list, it will create a new instance of
CommandResultclass that prints out an error message indicating an empty task list -
If there are tasks in the existing task list, it will call the
TaskList#clearList()method to clear the existing taskList
Example 2: Given below is an example usage of clear done command:
Step 1
The user launches the app and retrieves the tasks which are saved under a local file using Storage.
Step 2
The user enters clear done into the command line. Method Parser#parseCommand() will be called to parse the command provided.
Step 3
A new instance of ClearCommand with clearParam initialized will be created. The DeleteCommand#execute() will then be called.
Step 4
The execute() method will then call the ClearCommand#clearDone() :
-
If there are no tasks in the existing task list, it will initialize a new instance of
CommandResultthat prints out an error message indicating an empty task list -
If there are no completed tasks in the existing task list, it will initialize a new instance of
CommandResultthat prints out an error message indicating that there are no completed tasks -
Otherwise, it will call the
clearDone()method that will call theTaskList#deleteAllDone()method to delete all the completed tasks, excluding repeat events.
The following sequence diagram summarizes how the ClearCommand operation works:
3.3.2. Design Considerations
-
Creating another
clear donecommand instead of just 1clearcommand-
Rationale:
Considering that our target audience are students, we feel that it might be inconvenient for the students to delete each completed one by one, just to reduce the number of tasks that is being displayed duringlistcommand. -
Alternative Considered:
-
Delete the task once it has been marked as completed
-
Pros: Easier to implement and improved code readability
-
Cons: User may want to refer back to completed tasks for reference in the future and may not want to delete the completed task
-
-
Instead of deleting the completed tasks, we can choose to only list commands that have been completed
-
Pros: Easier to implement and improved code readability
-
Cons:
ArrayListwill be filled up with unnecessary tasks that could have been removed. This might affect the time complexity of future addition or searching operations on theArrayList.
-
-
-
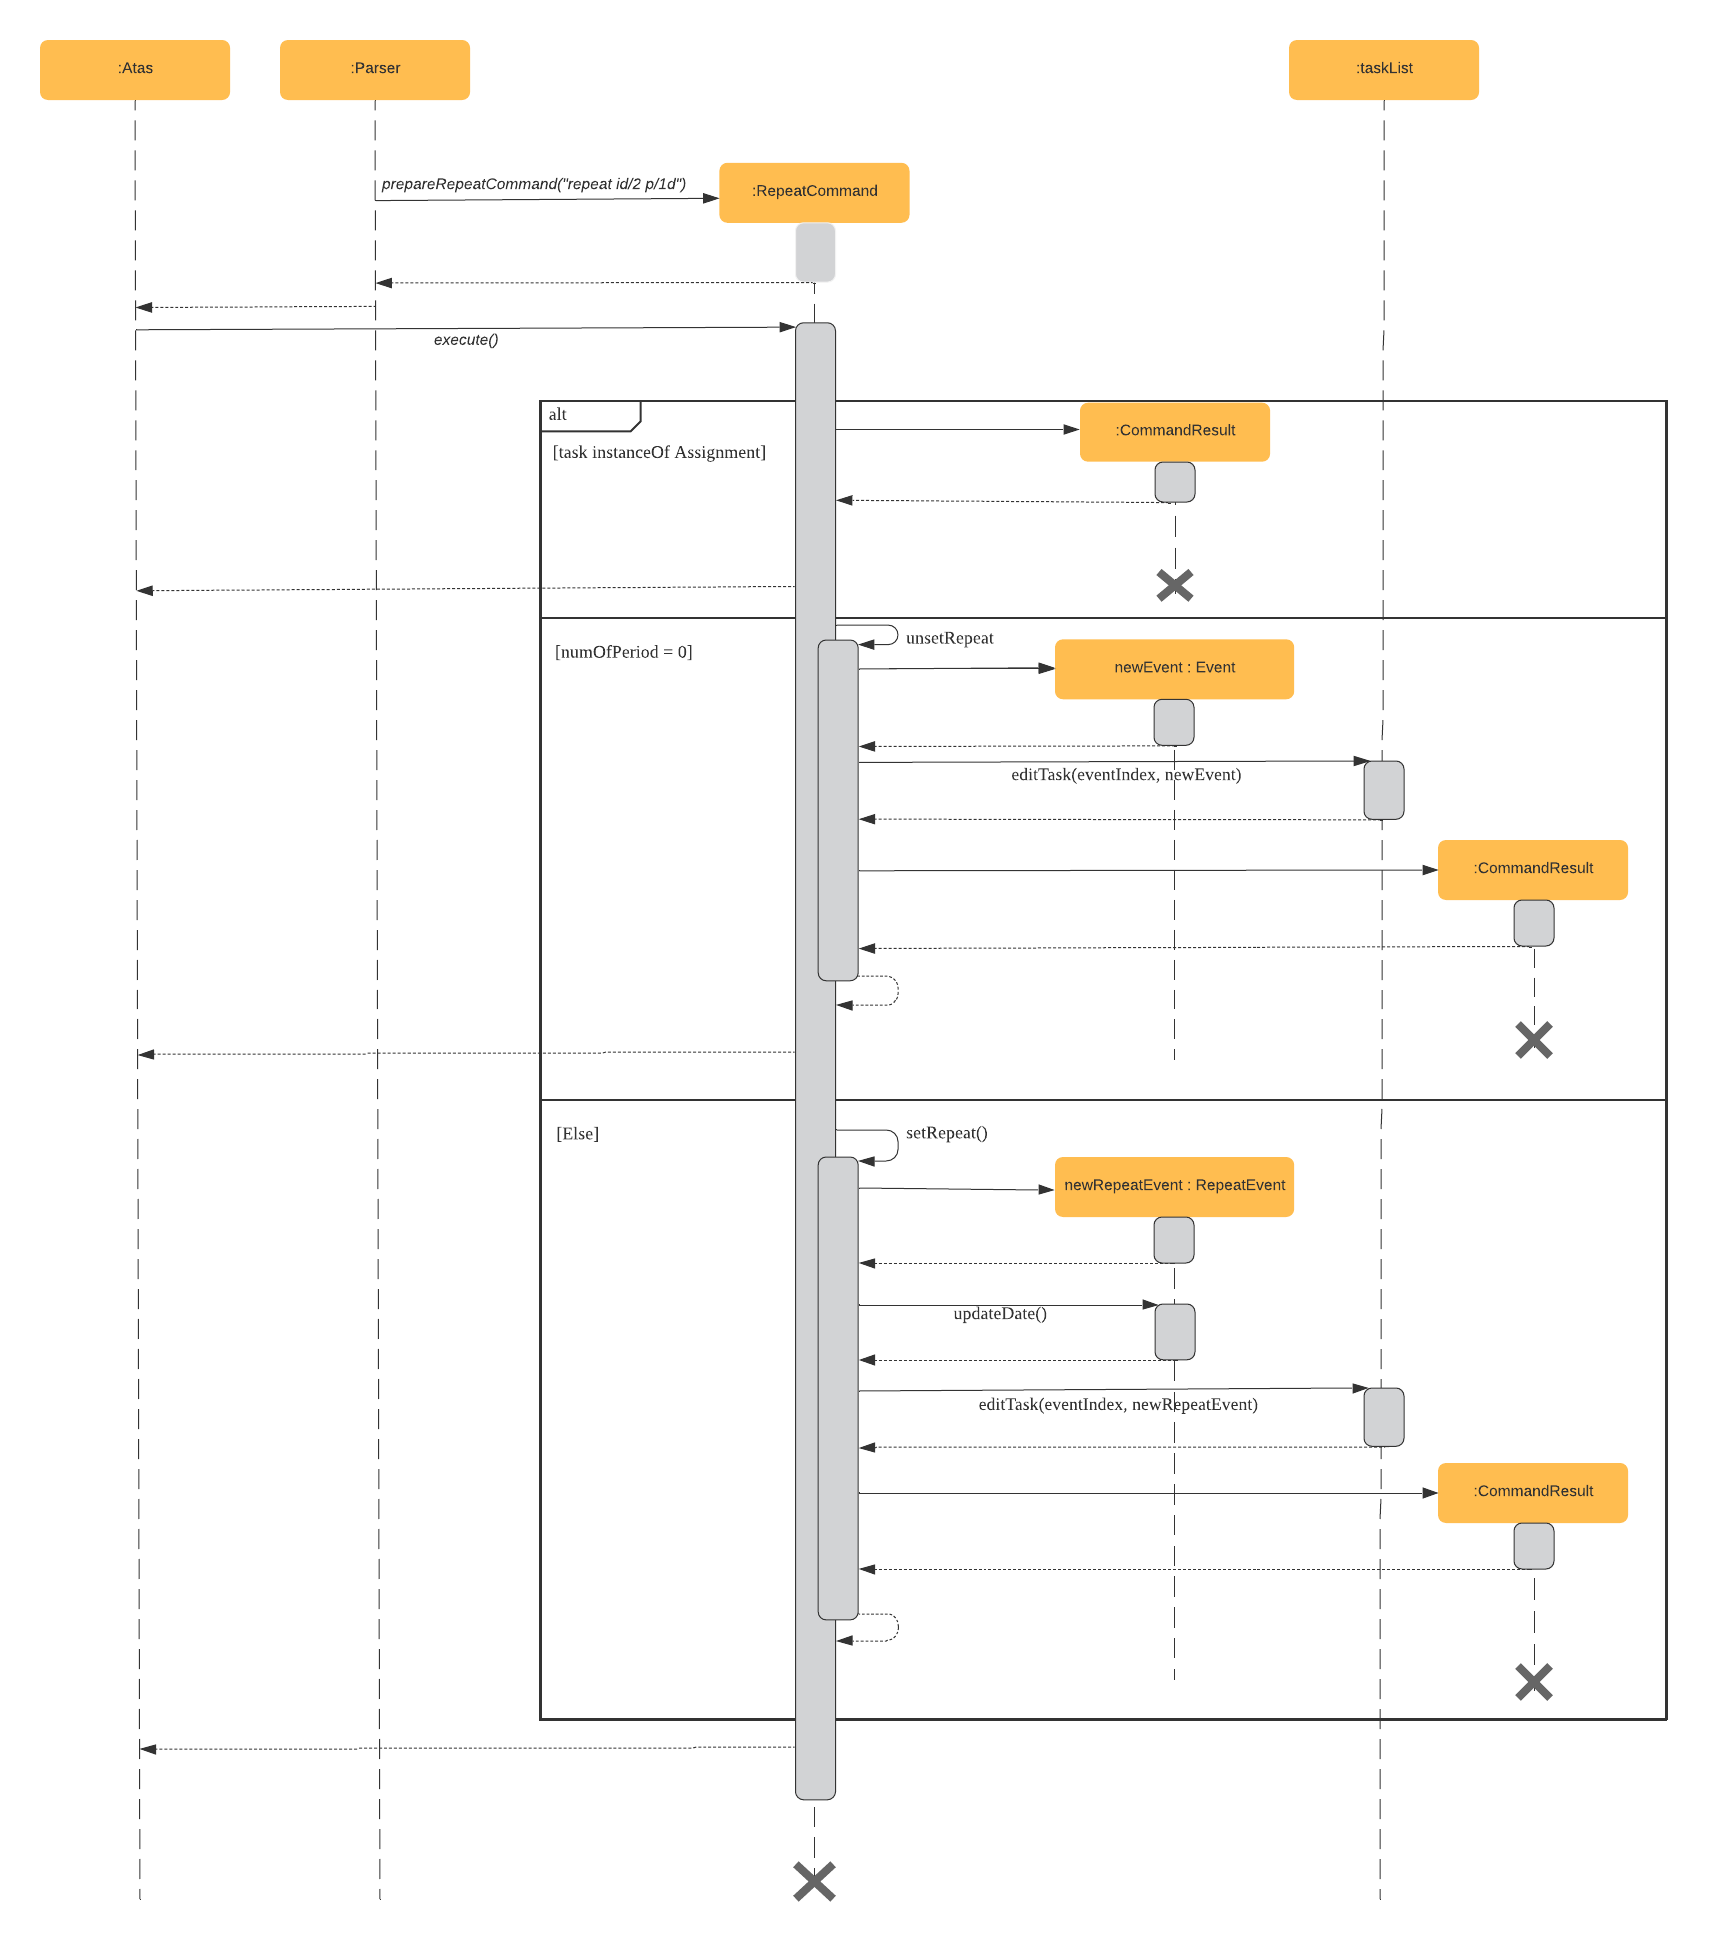
3.4. Repeat event feature
This feature allow users to repeat their events at a specified frequency forever, removing the need to insert the same event multiple times with different dates.
3.4.1. Current Implementation
The RepeatCommand class extends the Command class and either allows the stated event to repeat or to stop repeating. To allow an event to repeat, it will replace the current Event object with a RepeatEvent object (RepeatEvent inherits from Event). Likewise, to stop repeating, it replaces the current RepeatEvent with a Event object. A detailed explanation and the difference between the 2 classes will be elaborated later.
Given below is an example usage of the repeat id/2 p/1w command given by a user.
Step 1
Parser#parseCommand() will be called to parse the command provided. Through this method, we will be able to
obtain information to get integers eventID, numOfPeriod and string typeOfPeriod.
eventIDidentifies the task that the user wishes to repeat.numOfPeriodandtypeOfPeriodspecifies how often the user wants to repeat the event.
Note: Available
typeOfPeriod: Dayd, Weekw, Monthm, Yeary
Step 2
After parsing, a new instance of RepeatCommand with eventID, numOfPeriod and typeOfPeriod initialized will be created. RepeatCommand#execute() will then be called.
Step 3
The execute() method will check 3 things after it calls getTask() method from TaskList class to get the user input task.
-
It will check if the
eventIDprovided refers to a validEventtask. -
It will then check if
numOfPeriodequals to 0. In which case, it will be setting the event to not repeat by callingRepeatCommand#unsetRepeat().unsetRepeat()method will check if the given task is indeed aRepeatEventobject and then create a newEventobject using the variables fromRepeatEventand replace it in theTaskListwith no changes to any variables inEventobject.
-
If it is not 0, it will set the event to repeating by calling
RepeatCommand#setRepeat().setRepeat()method will use 2 of the variables (numOfPeriod,typeOfPeriod) to create a newRepeatEventobject, update its date to the next upcoming date if the current date is in the past by callingRepeatEvent#updateDate()and replace the currentEventobject at theeventIDinTaskList.
Step 4
After the execute() method completes, a new CommandResult class with a string containing the result of the execution. This string will
be printed by calling Ui#showToUser() Then the event will be saved into local file by calling Atas#trySaveTaskList().
The following sequence diagram summarizes how repeat command operation works, from the parser creating an RepeatCommand till when
execute() method called by Atas is returned:
3.4.2. Event and RepeatEvent Differences and their Impact
-
There are 5 main variables that differentiate a
RepeatEventobject from anEventobject, and keep track of Date and Time for an event to repeat accurately.-
int numOfPeriod: Set to the user input value that states the frequency whichtypeOfPeriodwill repeat at. -
String typeOfPeriod: Set tod(days),w(weeks),m(months) ory(years) to indicate how often it will repeat. -
LocalDateTime originalDateAndTime: Set to be the event’s current Date and Time and will not change so that we can keep track of the original Date and Time for other usages later. -
int periodCounter: Set to 0 at the start, but increases periodically. It will keep track of how many timesnumOfPeriodswith typetypeOfPeriodhas passed.
For example, ifnumofPeriodis2,typeOfPeriodisdand 6 days has passed sinceoriginalDateAndTime, thenperiodCounterwill be 3. -
LocalDateTime nextDateAndTime: Not initialized initially, but gets updated every timeupdateDate()is called. This is used to keep track of the event’s next date and time so that it could be utilized in other areas, such aslist upcoming eventsfor corner cases. For example, a repeating event that occurs today but we have passed its time (thus will not appear inlist upcoming eventsas the event has passed and its date will not be updated yet since it is still today) but should appear as it will repeat into the future.
-
-
With this implementation in mind, every time the app is launched, after
load()method inStorageclass is called, the app will call a methodupdateEventDate()which will iterate through every task in the list and callsRepeatEvent#updateDate()if the task is of classRepeatEventand its date is in the past. The method will update the dates of the tasks usingoriginalDateAndTimeand alsoperiodCounterto accurately update the starting date and time of theRepeatEventso that it reflects the closest possible future date if today is not possible. (More information on how date and time is updated is given below)
Note:
UsingoriginalDateAndTimeinstead of the recorded date and time of the task helps to circumvent a potential bug concerning the last few dates of a month. For example, given 31st Jan 2020, if we add 1 month to it using the LocalDateTime Java API, we will get 29 Feb 2020. Then adding another month, we will get 29 Mar 2020 instead of 31 Mar 2020.However by using
originalDateAndTime, and usingperiodCounterto keep track of how much time has passed (i.e how manynumOfPeriodwith typetypeOfPeriodhas passed), we can accurately and quickly obtain the correct next date and time. In this case, we will obtain 31 Mar 2020 instead of 29 Mar 2020.
- To users, apart from minor differences such as the icon and listing of
RepeatEventshows how often it is being repeated, there will be no other noticeable difference between anEventand aRepeatEvent. The implementation ofRepeatEventis transparent to the users and appear as if they can only add or editEventorAssignmenttasks and that there are only 2 type of tasks.
3.4.3 How date and time is updated in RepeatEvent#updateEvent()
There are 2 ways an event’s date and time is updated.
- When a
RepeatCommandis created to convert anEventobject toRepeatEventobject insetRepeat()method under Step 3 ofRepeatCommand. - When a user starts up ATAS with
RepeatEventobject in itsTaskList,Atas#updateEventDate()will be called. It will then callupdateEvent()for eachRepeatEventobjects and its date will be updated if it is in the past.
updateEvent()solely compares dates and not time.- It will loop until
startDate(which is theRepeatEventobject’s statedstartDateAndTime.toLocalDate()) is equal to or greater than the current date. With each loop, it will simply addnumOfPeriodof days, months or years using the methods provided by JavaLocalDateTimeAPI tostartDate.periodCounterwill also increase by one per iteration. - At the end of the loop, we add
numOfPeriod*periodCounterof days, months or years tooriginalDateAndTimeto get ourstartDateAndTime. Similarly, we add the same amount to theendDateAndTime.
Then we add 1 morenumOfPeriodof days, months or years tostartDateAndTimeto get ournextDateAndTime.
3.4.4. Design Considerations
-
Allowing only tasks that are
Eventto be repeated. As stated in our UG, an event is a task that you plan to do at a particular date and time with an end time in mind.-
Rationale:
We feel that given the context of university students, it makes little sense for most assignments to repeat. However, it makes sense for events to repeat since many events actually occur on a regular basis. -
Alternative Considered:
-
Allowing all tasks to be repeatable.
-
Pros: Allow more flexibility for the user to set which tasks they want to repeat, regardless of task type.
-
Cons: Memory wastage as additional variables are set for repeating tasks. In the case of minimal assignments being repeated, the space is wasted.
-
-
-
-
Allowing an
Eventto repeat for any period by usingnumOfPeriodandtypeOfPeriod.-
Rationale:
It provides great flexibility in allowing an event to repeat for any desired amount of time. For example, some classes occur every 2 weeks. Some events may happen every 10 days or any x period. -
Alternative Considered:
-
Removing
numOfPeriodand fixing it to just 4 types of recurrence (using solelytypeOfPeriod).-
Pros: It would simplify usability and implementation since there will only be 4 options to choose from.
-
Cons: It would reduce the usability for the 2 examples provided above as users would not be able to make events repeat every 2 weeks or 10 days, forcing them to have to manually type in the same event for as many times as it will occur if they wish to still keep track of that event.
-
-
-
-
Keeping
RepeatEventas a single entity within the list and not repeatedly adding new tasks with progressive dates whenRepeatCommandis used.-
Rationale:
It allows the repeated events to be easily removed or un-repeated as a there will only be a singleRepeatEventpresent in the list. However, this means that past instances of that event will not be kept and we feel that it is acceptable as past events are not nearly as important as future events for a time management app. -
Alternative considered:
-
Repeatedly add new events with changes in dates for a fixed amount when repeat command is used.
-
Pros: It will be simpler to implement and test if repeating events can be treated like any other events as coupling will be lower compared to current implementation.
-
Cons: Deleting a repeating event would be difficult as there would be multiple entries to delete. It will also flood the user’s list and increase the size of the local file that stores the
TaskList.
-
-
-
3.4.5 Future Enhancements
A list of possible future enhancements and implementations are provided below as ways to further enhance the user’s experience with ATAS.
- Allow users to add
RepeatEventdirectly instead of getting an event to repeat.- Possible Implementation:
- Create new
RepeatEventCommandclass similar toAssignmentCommandandEventCommand. Then editParserclass to allow user to create anRepeatEventfrom command line itself.
Note:
It is possible to reuseEventCommandandRepeatCommandcurrent implementations for the new class but will increase coupling as it reuses code from the 2 classes.
- Create new
- Possible Implementation:
- Allow users to keep track of past instances of repeated events for users to be able to reflect on how much time was spent on past
instances of the repeated event.
- Possible Implementation:
- Store past events in current/another local file that could be retrieved later on by the calendar or the app.
- Possible Implementation:
- Allow users to find repeated events on
searchdcommands.- Possible Implementation:
- Keep an array of future dates so that that array could be utilized by
searchdcommands if the task is an instance ofRepeatEvent.
- Keep an array of future dates so that that array could be utilized by
- Possible Implementation:
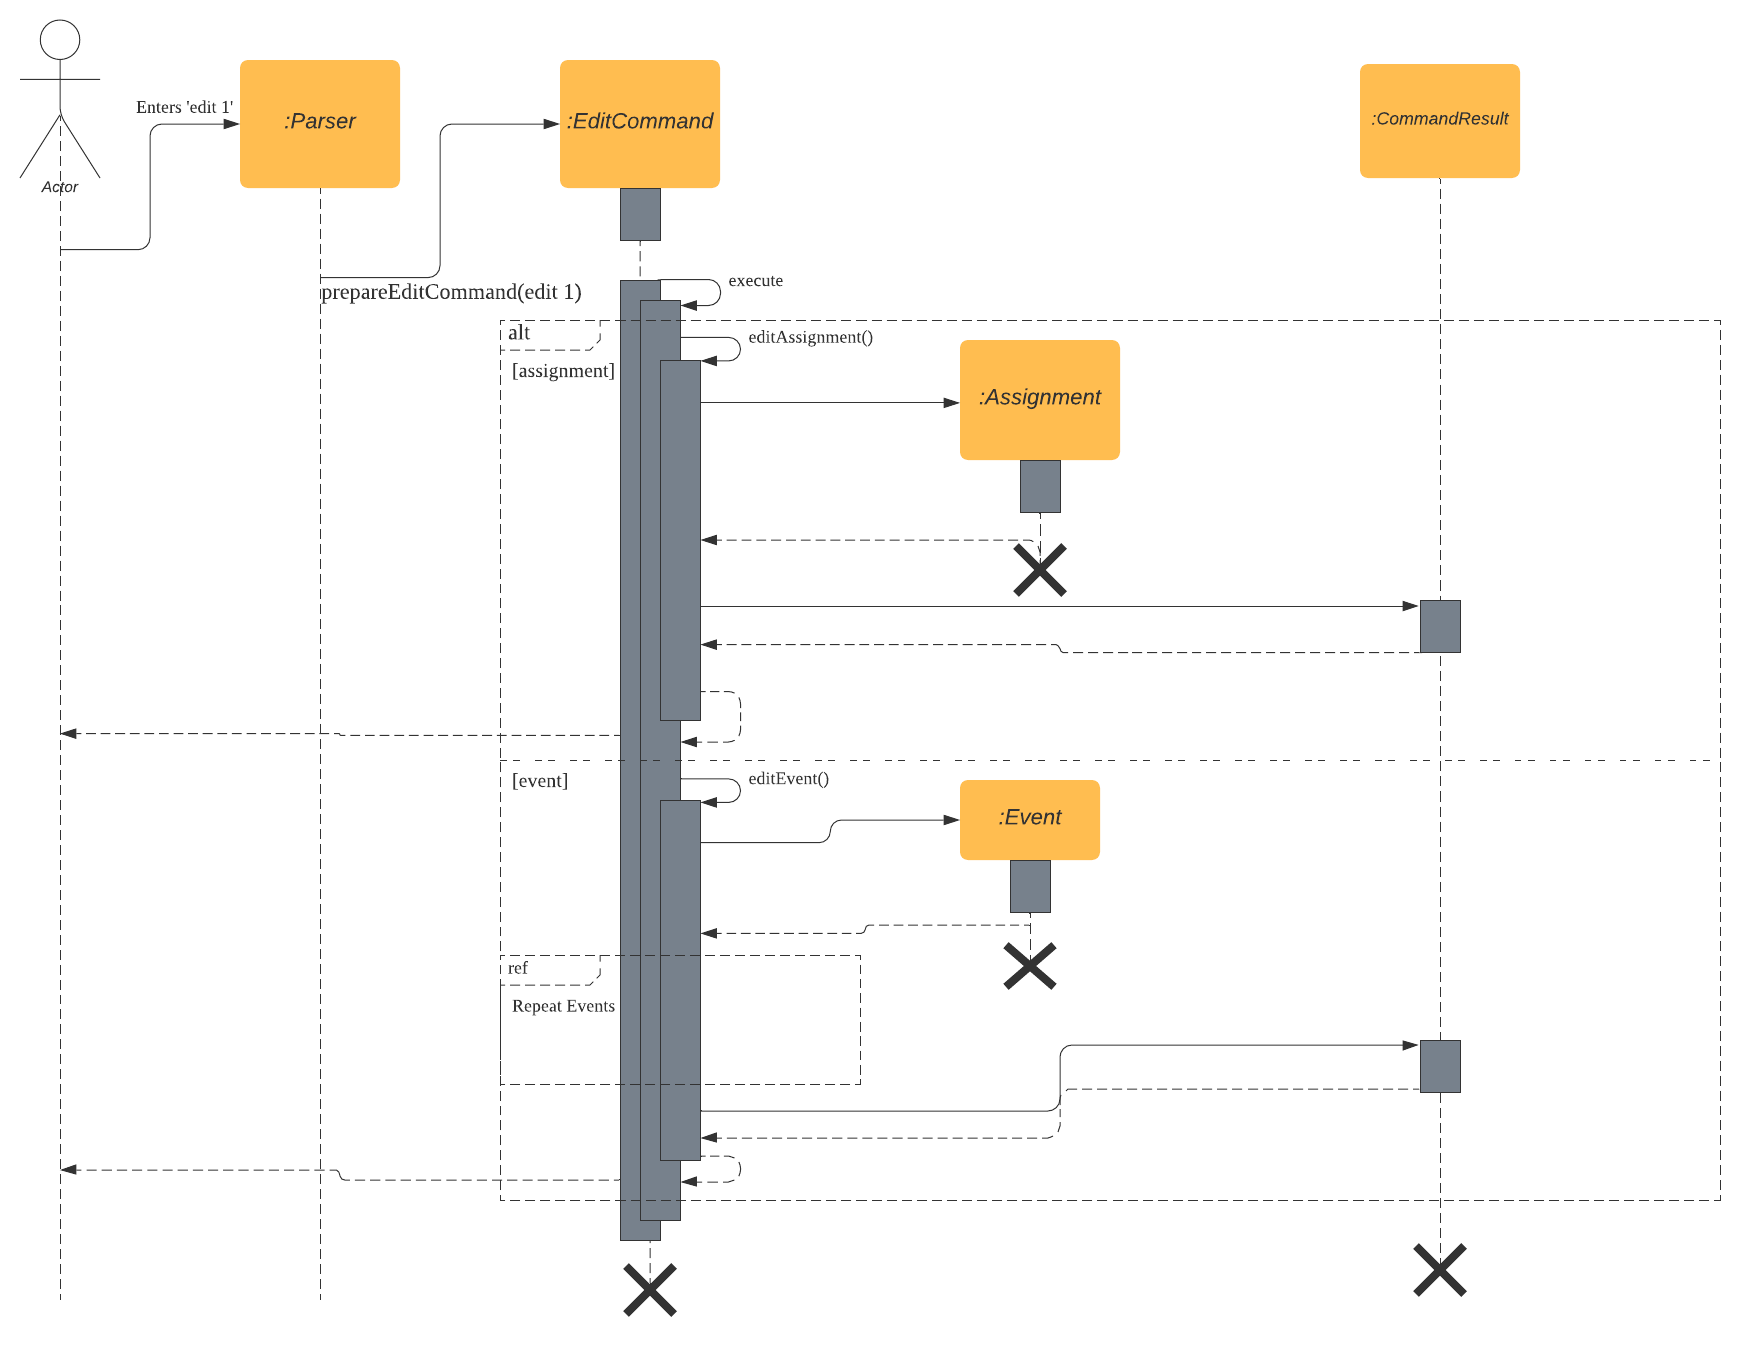
3.5. Edit Task Feature
3.5.1. Implementation
The EditCommand class extends the Command class by providing functions to edit specific tasks in the list of ATAS.
Given below is an example usage scenario of the edit command.
Step 1
The user types in edit 1. The parseCommand() method of the Parser class is called to obtain edit which is the type of command the user is entering.
Warning: An
IncorrectCommandclass will be returned and anUNKNOWN_COMMAND_ERRORstring from theMessagesclass will be passed into the constructor of that class if the command supplied was invalid.
Step 2
The parseCommand() method subsequently calls the prepareEditCommand() method inside the same Parser class. This method splits the fullCommand string parameters into 2 tokens. The integer 1 will be obtained as the Index of the task specified in the list. This method returns a new instance of the EditCommand class, passing the integer 1 as the parameter.
Warning:
AnIncorrectCommandclass will be returned and aNUM_FORMAT_ERRORstring from theMessagesclass will be passed into the constructor of that class if the number supplied was not an integer.
AnIncorrectCommandclass will be returned and aINCORRECT_ARGUMENT_ERRORstring from theMessagesclass will be passed into the constructor of that class if there are no task index supplied by the user.
Step 3
A new instance of the EditCommand class is returned to the main method of ATAS with parameter 1 as described above. The execute() method of the EditCommand class is now called.
Step 4
The execute() method in the EditCommand class first gets an input from the user on the details of the edited task.
Tip:
Assignment Command Format:assignment n/[NAME] m/[MODULE] d/DD/MM/YY HHmm c/[COMMENTS]
Event Command Format:event n/[NAME] l/[LOCATION] d/DD/MM/YY HHmm - HHmm c/[COMMENTS]
Step 5
If the user supplies an assignment command, the editAssignment() method will be invoked. This method extracts the assignmentName, moduleName, dateTime and comments string to return a new instance of the Assignment class.
If the user supplies an event command, the editEvent() method will be invoked. This method extracts the eventName, location, startDateTime, endDateTime and comments string to return a new instance of the Event class.
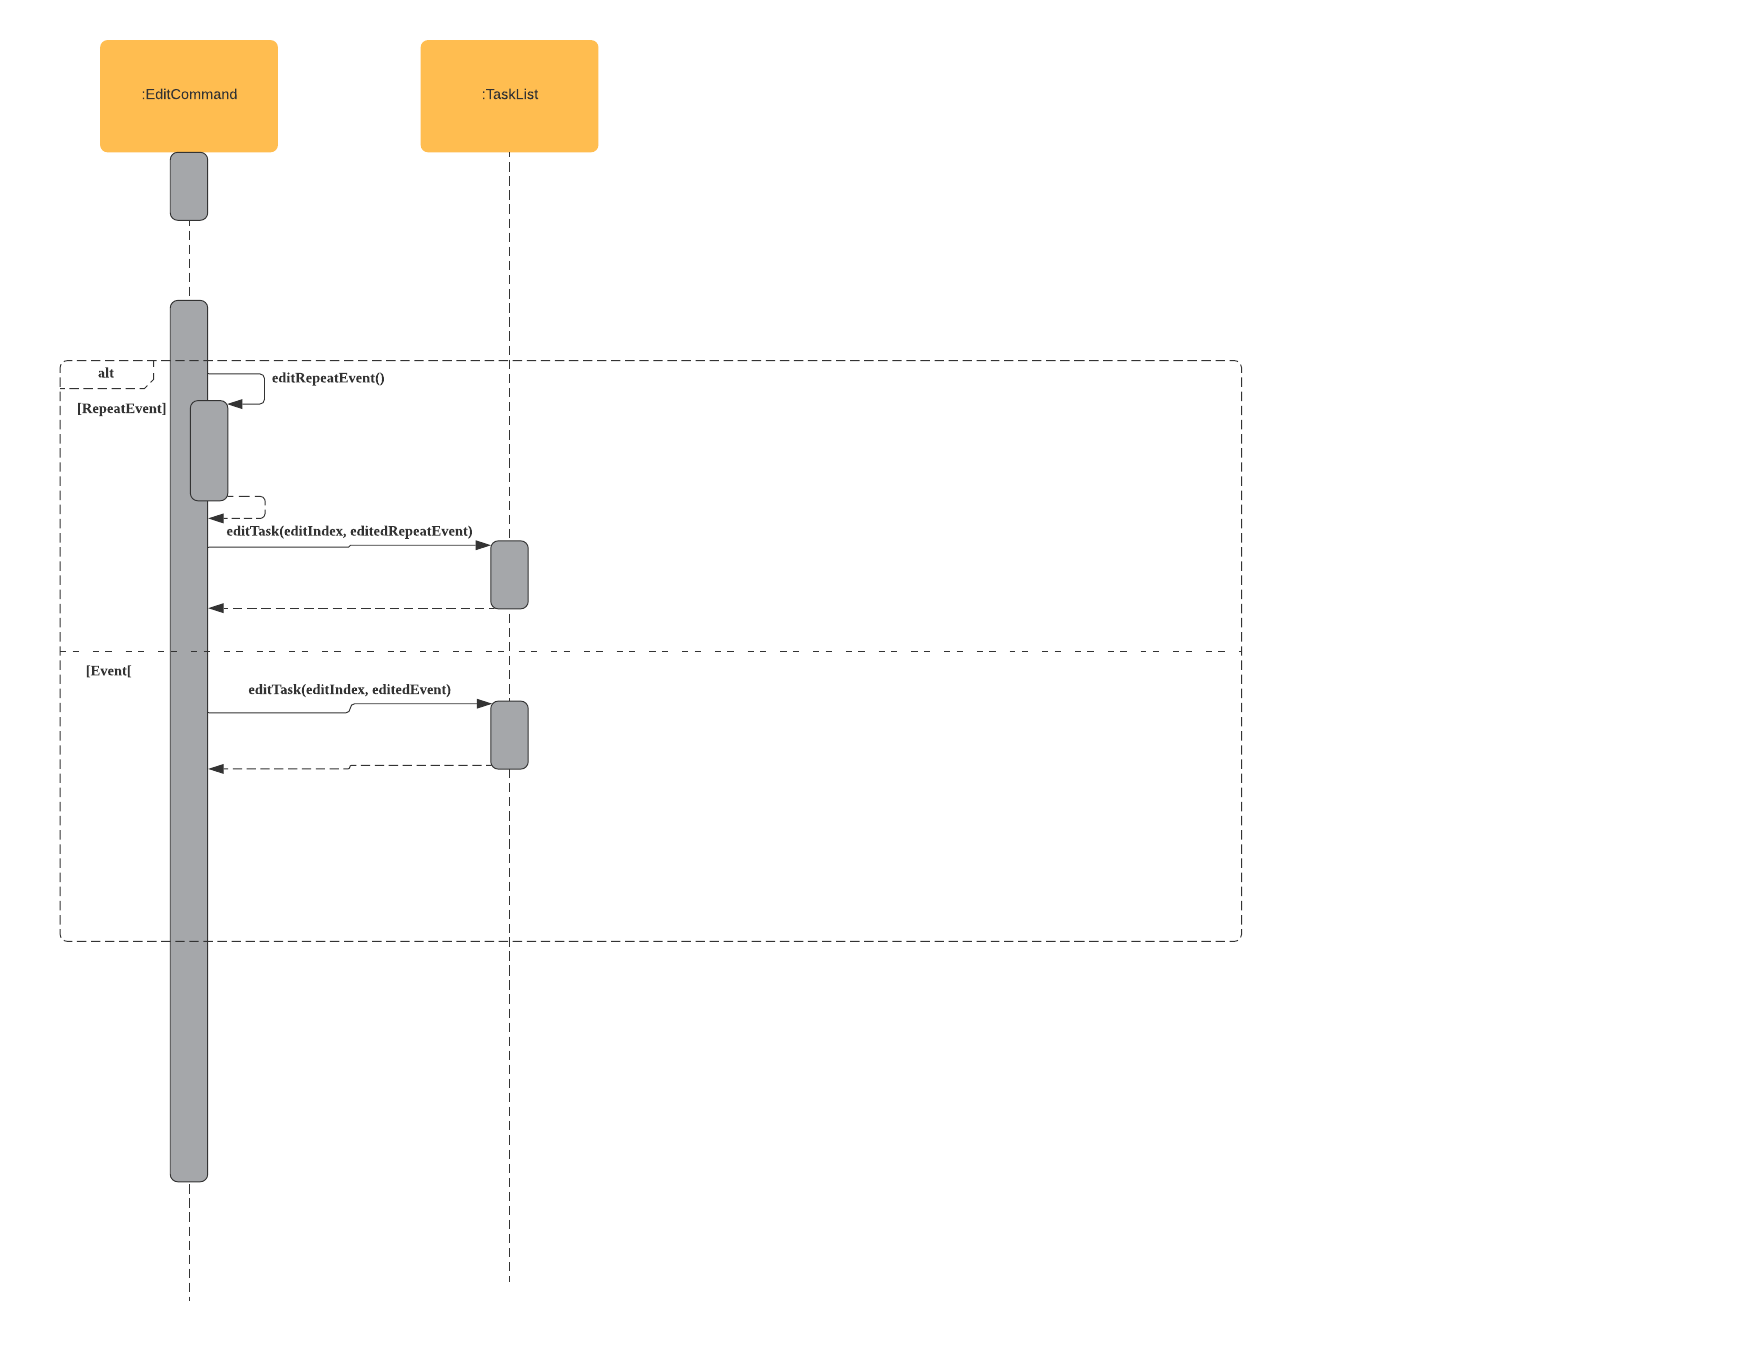
Afterwards, the task will be checked to see whether it is a RepeatEvent task type. If it is not, it will proceed to Step 6.
If it is a RepeatEvent task, the edited task as well as the task to be edited is passed to a editRepeatEvent method to edit the repeated task.
In the editRepeatEvent method, the numOfPeriod, typeOfPeriod, originalDateAndTime and periodCounter will be extracted to be passed into creating a new RepeatEvent task.
Step 6
This newly instanced class (either Assignment or Event) will be passed into the method editTask() of the TaskList class. The editTask() method of the TaskList class uses Java’s ArrayList#set() method to replace the task.
Step 7
Finally, a CommandResult class is returned with EDIT_SUCCESS_MESSAGE passed as the parameter to the constructor of that class.
The following sequence diagram summarises what happens when the EditCommand class is executed.
The following sequence diagram shows the checking of RepeatEvent task type.
3.5.2. Design Considerations
-
Placing invocation of new
AssignmentandEventclass inEditCommandclass-
Rationale:
Theexecute()method ofEditCommandclass has to use theUiclass parsed as one of the parameters to get input from user on new details of the task. The new input captured will be then passed to theeditAssignment()oreditEvent()method in theEditCommandclass. -
Alternatives Considered:
TheeditAssignment()andeditEvent()methods can be placed in theParserclass and called in theprepareEditCommand()method of that class.
-
-
Using Java’s
ArrayList#set()method-
Rationale:
When a task is selected to be edited, it is logical for the index of the task to not change as the task is being edited. Therefore, theset()method ofArrayListis used to replace the edited task with the old task. -
Alternatives Considered:
Use the availableadd()anddelete()methods, the new task is added into the list and the old task is deleted. However, this is not chosen as it is not intuitive for the user’s task index to shift after editing the task.
-
-
Editing of
RepeatEventtask types will retainRepeatEventtask type-
Rationale:
When aRepeatEventtask is edited, theRepeatEventtask retains theRepeatEventtask type. It is only logical in editing that when a user edits an event, only the details of the event is changed. The task type of the original task should not change. -
Alternatives Considered:
Any editing ofRepeatEventtask will revert task back toeventtask and user will have to issuerepeatcommand to seteventtask torepeat. However, this will affect the usability ofeditCommandthus this alternative is not selected.
-
3.5.3 Future Enhancements
- Allow users to edit
RepeatEventdirectly from edit task prompt- Possible Implementation:
CallRepeatEventCommandif aRepeatEventtask is to be edited to prompt user if they want to edit therepeatdetails of aRepeatEventtask.
- Possible Implementation:
- Notify users if users of edits during exit of ATAS. This helps user keep track of what edits he/she made to existing tasks.
- Possible Implementaion:
Keep an ArrayList of tasks which are edited and when user is exiting ATAS, notify the user by printing ArrayList.
- Possible Implementaion:
3.6. View Calendar feature
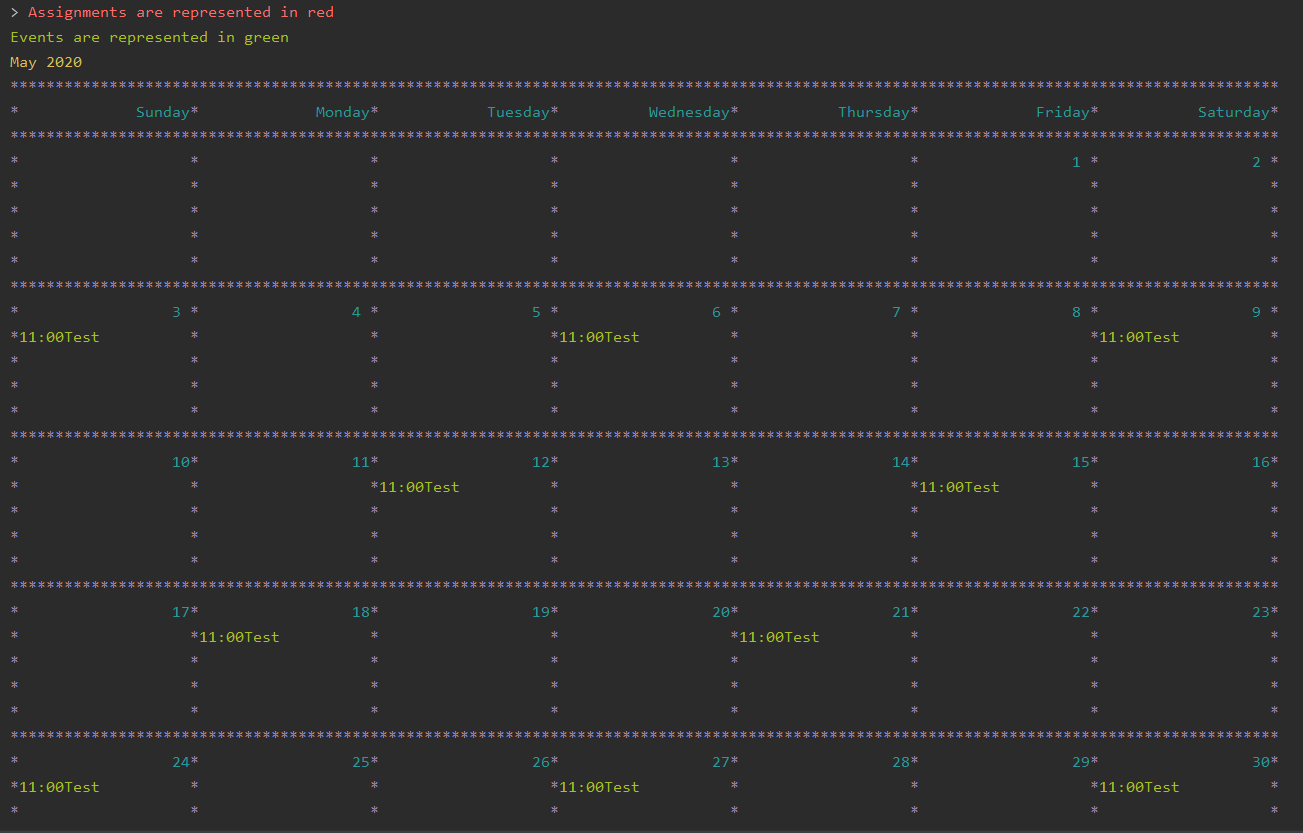
3.6.1. Implementation
The CalendarCommand class extends the Command class with methods to implement the necessary pre-processing to display an overview of tasks in the given date. The following sequence diagram outlines an example execution of CalendarCommand when it is called and the interaction it has with the relevant components.
In particular, the diagram below shows the sequence that buildMonthCalendar() method of the CalendarCommand takes.

Given below is an example usage of the calendar command. The step by step execution is shown in the sequence diagram above.
Step 1
The users enters the command calendar d/05/20. This is captured by the Ui component and is subsequently parsed by the Parser component that the main component calls.
Note:
The arguments specified after the command wordcalendarrepresents the month and year of the calendar view returned.d/05/20refers to May 2020.
Step 2
The Parser will construct a CalendarCommand object with the LocalDate provided by the user input.
Note:
To reduce confusion, the LocalDate object created has its day hardcoded to 1, and is implemented by appending
01to front of[MM/YY].
Note:
AnIncorrectCommandobject will be constructed with its specific error message instead according to the error encountered. This can be in the form of no arguments provided or parser fails to parse the date provided.
Step 3
The execute() method in the CalendarCommand is then called by the Atas class.
The method manages all pre-processing to get the details needed to formulate the calendar. Details include details of tasks that fall within the given month, and the details of the month itself. The pre-processing work is listed in sequential order below:
-
Calibrates an instance of
Calendarof theJava.utilclass with the providedLocalDateand obtain all necessary information about theCalendarmonth. -
Obtains all
Taskdetails that falls within the range of the month. This is performed through calling thegetTasksByRange()method of theTaskListclass. -
Duplicates all
RepeatEventthat is returned from the method above to obtain anArrayListof allTaskobjects that exist within the month. -
Appends the
Calendartitle and legend to the resultant string that contains the calendar view.- This is done through separate method calls to
addCalendarTitle()andaddCalendarLegend()respectively.
- This is done through separate method calls to
-
Appends the main body of the
Calendaraccording to theArrayListofTaskobtained earlier through a method call toaddCalendarBody(). -
Constructs a
CommandResultobject with the resultant string that contains the calendar view and returns this object.
Note:
Since anEventcan be set to repeat, but is stored within theTaskListas a singleTaskobject, duplicating a repeatEventallows us to obtain the full list ofTasksthat might occur within the month as separate Task. The decision is further explained in the design considerations subsection.
Step 4
The CommandResult object is subsequently passed to Ui component which obtains and prints the Calendar view by calling showToUser() method of the Ui component.
3.6.2. Design Considerations
-
Duplicating
Taskobjects instead of keeping theRepeatEventas a single entity like how it is stored in theTaskList.-
Rationale:
By duplicating theRepeatEvent, it allows better abstraction of methods by removing the need to constantly differentiate between a normalTaskand a repeatingTaskduring the construction of the final Calendar View. The current implementation allows theaddCalendarBody()method to obtain all possibleTaskobjects within the given month, with each possibleRepeatEventbeing stored as a separateTask. EachTaskcan subsequently be removed from theArrayListafter it has been printed which makes the task simpler and reduces coupling. -
Alternatives considered:
AllowingTaskListto acceptTaskwith duplicated details. However, this will in turn further complicate design when performing other features that deal with a singularTasksuch asdelete,search,done. (See Section 3.4.4, RepeatEvent design considerations)
-
-
Truncation of
Taskdetails instead of extending column size-
Rationale:
This keeps the calendar compact such that the command line application can be viewed as a smaller window as opposed to the taking up the entire screen. Since row size is also extendable, extending column size independently from row size will destroy the integrity of a traditional calendar box view. -
Furthermore, there are other features that can be used in conjunction with the
Calendarto allow users to obtain more information of theTasksuch asSearchCommandandListCommand. -
Alternative Considered:
Wrapping ofTaskdetails to display its full details. This is not feasible as this further increases the need for number of rows. As mentioned, we would like to keep the integrity and view of a traditional calendar and this does the opposite of that.
-
-
Limiting the number of
Taskobjects that can be displayed for a particular calendar date-
Rationale:
Limiting the number of task might misrepresent the list ofTaska user has for any particular date if there are more tasks than available slots on the calendar date. To solve the issue of misrepresentation, we decided to replace the lastTaskslot of eachCalendardate with an indicator to indicate there are tasks not shown if there are indeed tasks left out due to the constraints that is the lack ofCalendarrows. -
Alternative Considered:
Expanding number ofCalendarrows. This will require the need to increase the number ofCalendarcolumns to preserve the integrity of a traditional calendar view. However, this also is infeasible as our goal is to keep the calendar compact such that it does not need to fill the screen.
-
3.6.3. Future Enhancements
-
Future enhancement to the Calendar feature of ATAS is inclusive but not limited to the following:
- Allowing users the ability to dictate their dimensions of the calendar view so that they are able to customise the size to their preference. Current implementation involves hardcoded dimensions that might not meet every users’ requirements.
3.7. Storage
3.7.1. Implementation
The Storage class uses the encode() and decode() method of each Task subclass to save and load Task data in a file on the user’s computer.
Every time a Command is executed, the Storage#save() method is run to update the save file.
3.7.2. Saving the current state of ATAS with Storage#save():
Step 1
For each Task in the TaskList, Task#encode() is called, and the result is appended to a save string. Each encoded Task is separated by a newline.
Step 2
The save string is written into the specified save file, which will be created if it does not already exist.
3.7.3. Loading previously saved TaskList data into ATAS with Storage#load():
Step 1
Read each line from the save file one by one. Each line corresponds to an encoded Task.
Step 2
For each line, determine its Task type, and call the static decode() method from the corresponding class.
Step 3
Add each decoded Task into a TaskList.
Step 4
When all lines in the save file have been decoded, return the TaskList.
3.7.4. Design Considerations
-
Saving the
TaskListafter everyCommandexecuted-
Rationale
There will be reduced coupling asStorage#save()is always called regardless of whatCommandis executed. However, unnecessary saves will be made as not allCommandexecutions modify theTaskList. -
Alternatives Considered
Storage#save()could be called only afterCommandexecutions that modify theTaskList, so that no unnecessary saves are made. However, this method increases coupling as eitherStoragewill have to know whatCommandwas executed, orStorage#save()has to be called inCommand#execute(). -
Conclusion
As theTaskListis expected to be small for most users, the drop in performance due to unnecessary saves is negligible. The first method is chosen to make the code easier to maintain.
-
4. Testing
Testing is required to ensure that the code written is accurate, bug free (at least in the tests designed) and do not cause any existing feature to fail. For ATAS, there are 2 ways to run automated testing.
4.1. Using IntelliJ JUnit Tests
-
To run all test, right-click on
src/test/javafolder and chooseRun 'All Tests' - To run all test using Gradle: Open a console and run the command
gradlew clean testNote:
For more tips on how to use gradle commands, look at Gradle Tutorial - For individual test, navigate to folder
src/test/java. From there, you can right-click any of the test package, class or a single test and chooseRun 'TEST'to run the corresponding test.
4.2. Using Input-Output Tests
- Open a console, navigate to the
text-ui-testfolder and run theruntest.bat(Windows) orruntest.sh(Mac / Linux) script.
This will run ATAS with the commands written ininput.txtand compare its output with the text fileEXPECTED.txt.
5. DevOps
5.1 Build Automation
We use Gradle for tasks related to build automation, such as running tests, and checking code for style compliance.
To run all build-related tasks:
- Open a terminal in the project’s root directory
- Run the command:
- Windows:
gradlew build - Mac/Linux:
./gradlew build
- Windows:
- A message stating
BUILD SUCCESSFULwill be shown in the terminal if all tasks were run successfully. - Otherwise, use the error report provided to resolve the issue before trying again.
5.2 Continuous Integration
We use Github Actions for continuous integration. No setup will be required for users who fork from the main ATAS repository.
- Whenever you create a pull request to the main repository for ATAS, various checks will automatically be executed on your pull request.
- If any checks fail, click on it to view the cause of the error, and fix it in your branch before pushing it again.
- Ensure that all checks pass before merging your pull request.
5.3 Coverage Reporting
We use the IntelliJ IDEA’s coverage analysis tool for coverage reporting. A tutorial on how to install and use this tool can be found here.
5.4 Making a Release
To make a new release:
- Update the shadowJar
archiveVersionin the build.gradle file - Generate the JAR file using Gradle by opening a terminal in the project’s root directory, and run the command:
- Windows:
gradlew clean shadowJar - Mac/Linux:
./gradlew clean shadowJar
- Windows:
- Find the JAR file in the
build/libsdirectory. - Tag the repository with the new version number (e.g.
v2.1). - Create a new release using Github and upload the JAR file found in step 3.
6. Appendices
6.1. Appendix A: Product Scope
Target user profile:
-
university students who use a computer often, and are reasonably comfortable with the command line interface
-
desire to efficiently organise, manage, view and record their day to day events and tasks through an application
-
has a need to manage a number of university assignments and university / personal events that might occur on a regular basis
-
prefers desktop applications over other types of applications
-
prefers using a command line interface over a graphical user interface
-
able to type fast and prefers typing over mouse input
-
prefer one-line commands over multi-step commands
Value proposition: manage tasks faster and with greater efficiency than a typical GUI based task manager application
6.2. Appendix B: User Stories
S/N |
Version |
As a … |
I can… |
So that I … |
01 |
V1.0 |
User |
Add assignments, including assignment details |
Can keep track of assignment details |
02 |
V1.0 |
User |
Add events, including event details |
Can keep track of event details |
03 |
V1.0 |
User |
Have a daily view of tasks |
Can see what is important for today only |
04 |
V1.0 |
User |
Have a weekly view of tasks |
Can better plan my time to meet deadlines |
05 |
V1.0 |
User |
List all the tasks |
Can have an overview of tasks and mark individual tasks as done or delete specific tasks |
06 |
V1.0 |
User |
View all incomplete assignments |
Can know the progress of my work |
07 |
V1.0 |
User |
View all upcoming events |
Can see which period of time I will be busy and plan my time accordingly |
08 |
V1.0 |
User |
Mark an assignment as completed |
Can easily view which assignments I have yet to complete |
09 |
V1.0 |
User |
Delete tasks |
Do not clog up the calendar |
10 |
V1.0 |
User |
Clear all tasks |
Can clear all tasks with a single command |
11 |
V1.0 |
User |
Clear all completed tasks |
Can remove all completed tasks from the app in a single command |
12 |
V2.0 |
User |
Edit details of assignment |
Do not have to delete and create a new assignment instead |
13 |
V2.0 |
User |
Edit details of event |
Do not have to delete and create a new event instead |
14 |
V2.0 |
Long-term User |
Have my data persist between sessions |
Do not need to close the application when I am not using it |
15 |
V2.0 |
Frequent User |
See the tasks I have for the day when the app starts up |
Can quickly check my schedule for the day |
16 |
V2.0 |
User with many tasks |
Search for an event by name |
Do not have to scroll through a long list to find its details |
17 |
V2.0 |
User with many tasks |
Search for an assignment by name or module |
Do not have to scroll through a long list to find its details |
18 |
V2.0 |
User with fixed schedule |
Set my events as repeated events |
Do not have to manually create many events with the same details |
19 |
V2.0 |
Busy user |
Set an ending time for my events |
Can see clearly when I am free in my schedule |
20 |
V2.0 |
User |
Set my tasks in calendar view |
Can have an easy-to-read, sorted overview of my upcoming tasks |
6.3. Appendix C: Non-Functional Requirements
-
App should work on Windows, Linux, Unix, OS-X operating systems if Java
11has been installed. -
User with above average typing speed for English text (not coding) should be able to utilize the app to manage tasks more efficiently compared to using a mouse.
-
App should run without any noticeable loss in performance when about 100 tasks are present in the user’s list.
-
The user interface should be intuitive enough for users who are not IT-savvy but understands the basics of a task managing application.
-
Data saved in a session should be persistent and carry forward to the next session of use.
-
Saved data files should be portable across different instance of application on different devices, meaning one can resume a saved session on another device if he so chooses to. Moving from one OS to another does not create any issues either.
-
Application should not crash, application should always recover from error gracefully with an error message.
-
Response in the form of command line output should be intuitive, quick and respond specifically to the user’s intent or instructions
-
Documentation in the form of User Guide and Developer Guide should be clear, concise and understandable to their respective target audience.
-
Source code are to remain open source such that anyone can make editions to create their own rendition of the application.
-
Saved data files should not be tampered with by the user unless they understand the methods to make changes. Application should recover from unreadable tampered data files by overwriting the entire file with new session data while old session data is lost.
-
Application should be scalable to handle increased functionality at any instance.
6.4 Appendix D: Documentation
6.4.1 Introduction
We use MarkDown for writing documentation.
Note:
We choose Markdown over asciidoc, although asciidoc provides more flexibility in formatting because Markdown is easier to master for new developers, and also because it is easier to be deployed on GitHub Pages
6.4.2 Editing documentation
See here to learn the basic syntax for Markdown. To preview your changes to your Markdown documents, you could download the Markdown plugin for IntelliJ, that allows you to preview your changes real-time. Alternatively, you could push the changes to GitHub and view the changes from your commits.
6.4.3 Editing diagrams
See here to learn how to use LucidCharts to draw your own diagrams.
6.4.4. Publishing Documentation
-
Push the new documents to your own repository on github
-
Make a pull request to here to request for changes to be made to the documentation. (Click here) to learn how to make a pull request.
-
The moderators will review your change and make a decision if they want to use your changes
6.4.5. Converting Documentation to PDF format
-
Click here to find the desired guides that you wish to convert to PDF format.
- For Google Chrome users:
-
Go the
settingsicon and click onprint
-
In the print screen, choose the option
save as pdfand clicksave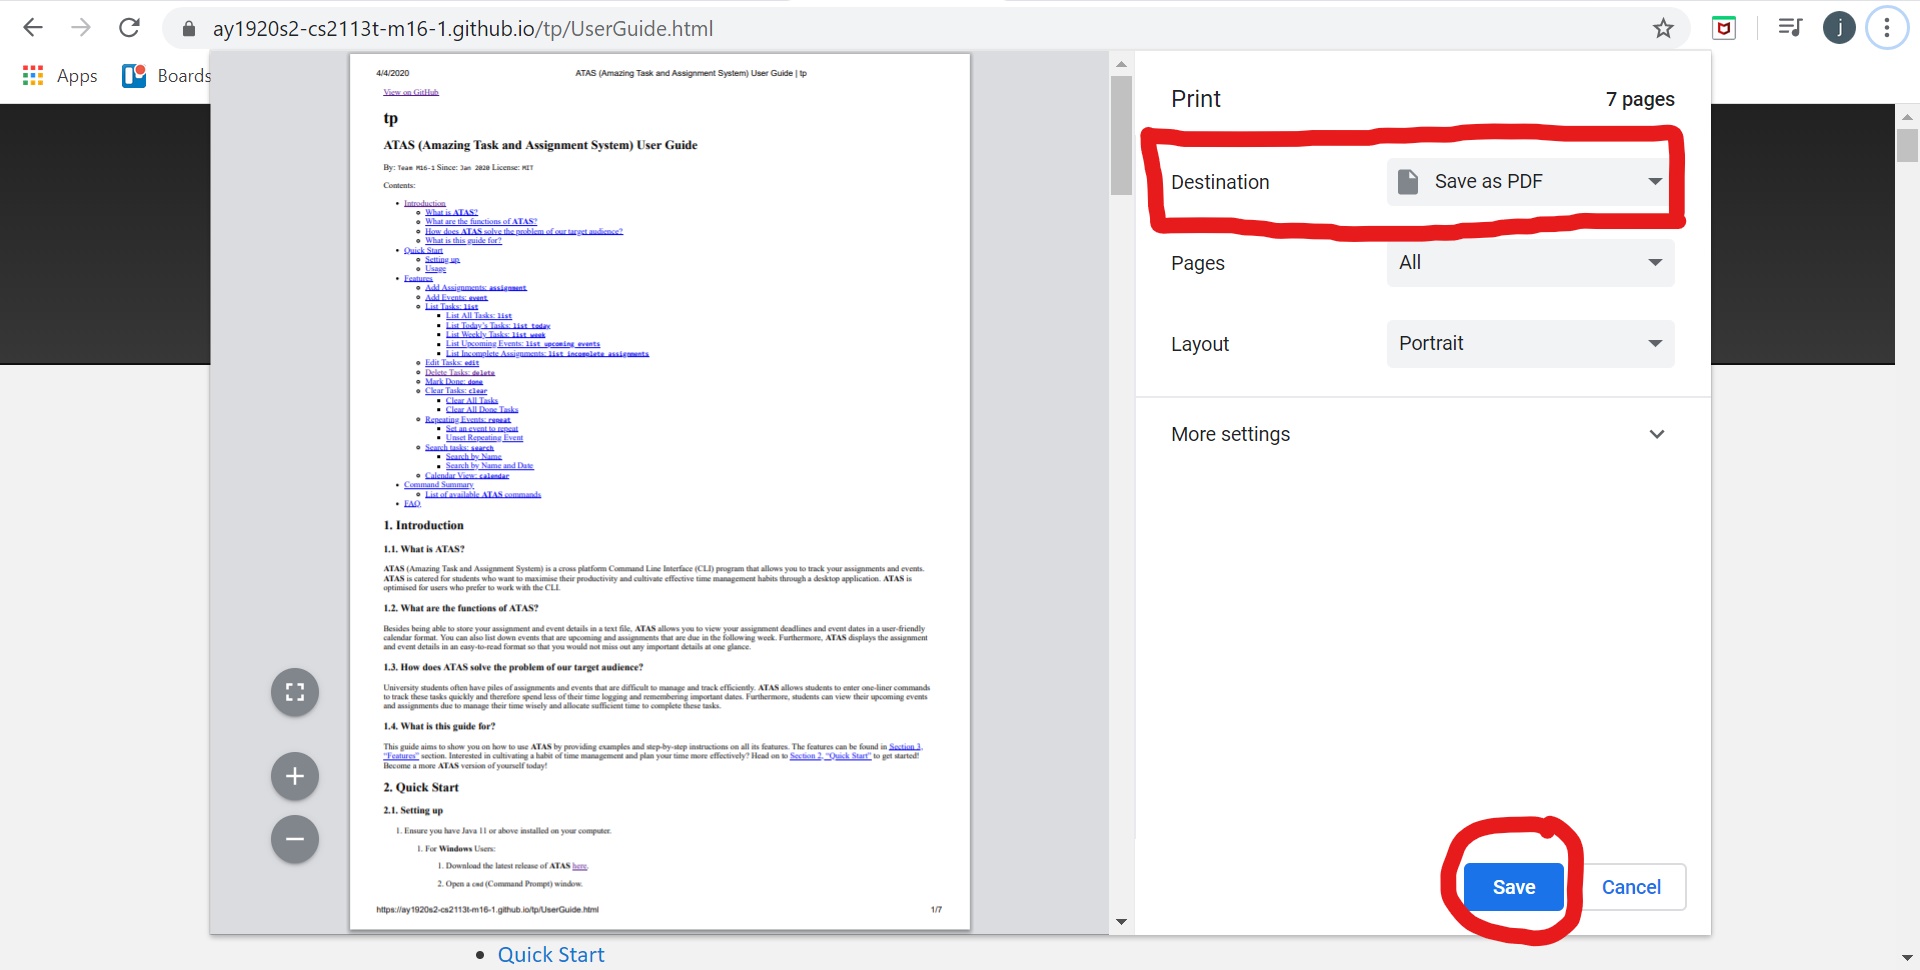
-
- For Windows users:
-
Go the
settingsicon and click onprint
-
In the print screen, choose the option
Microsoft Print to PDFand clickprint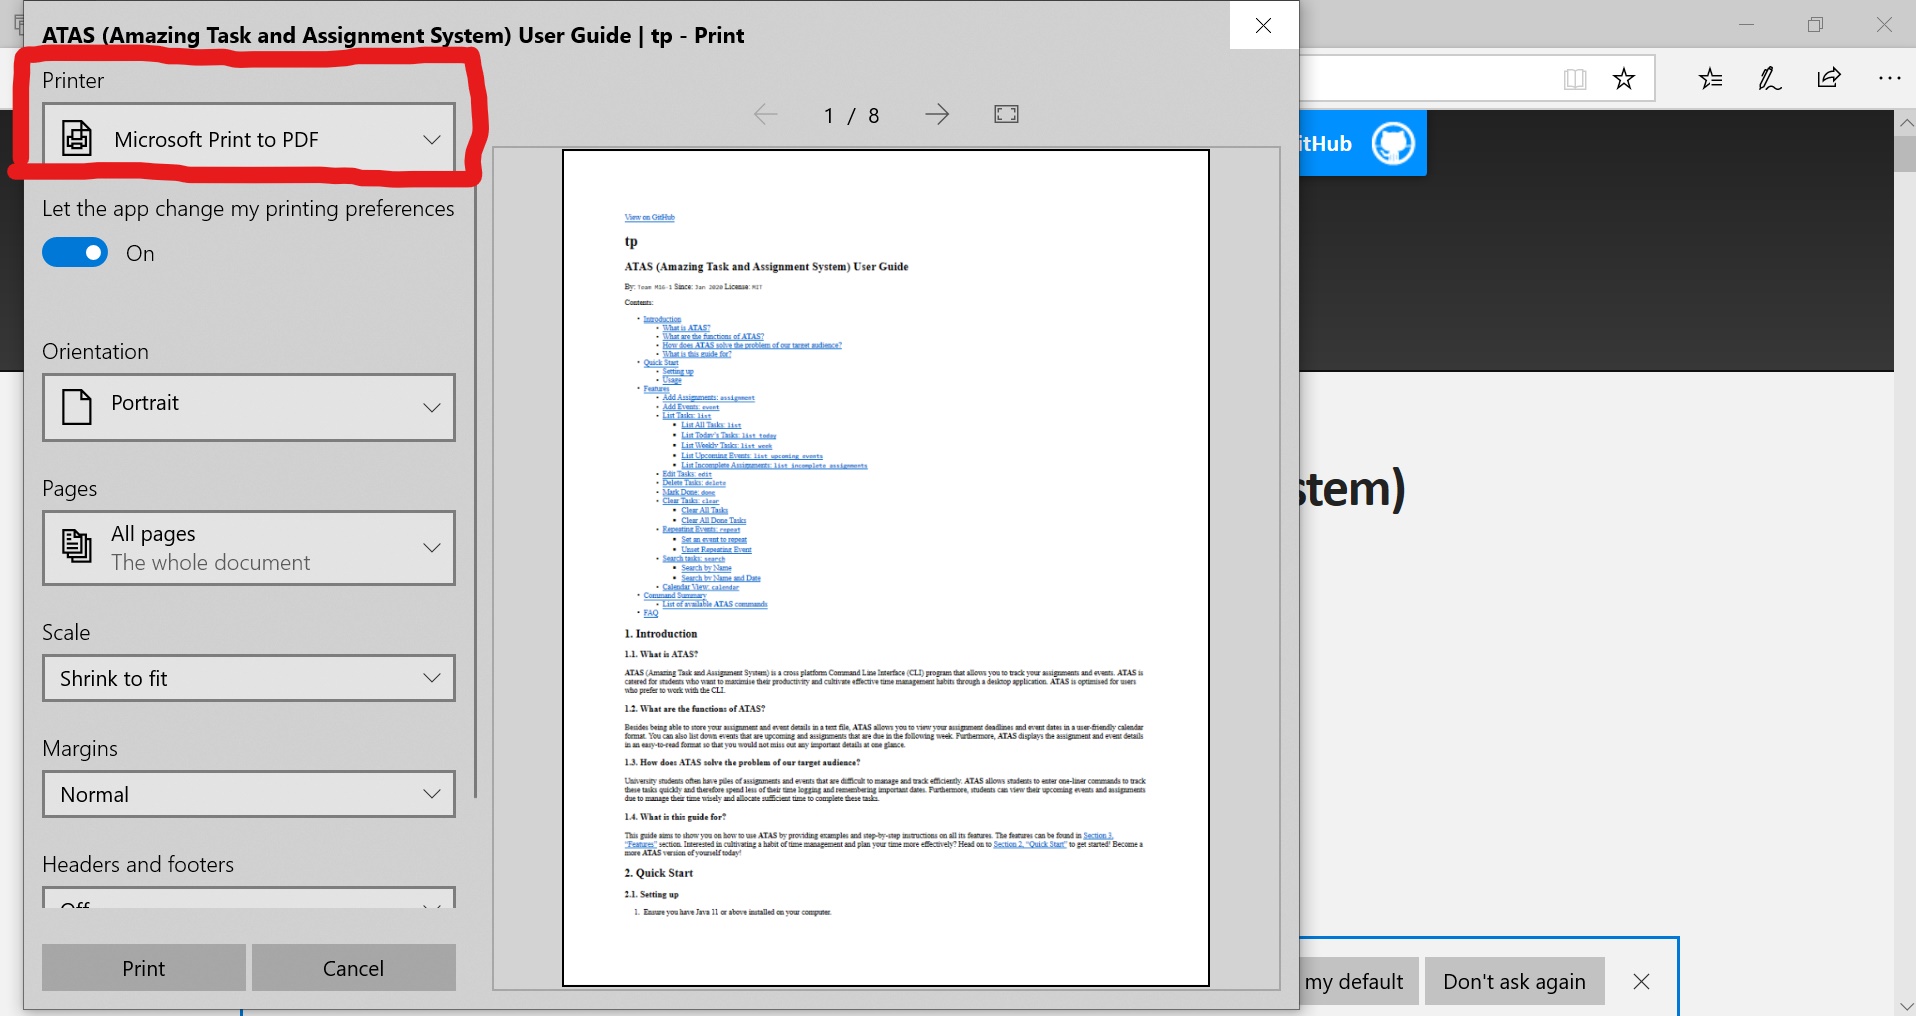
-
6.5 Appendix E: Instructions for Manual Testing
6.5.1 Launch and Shutdown
Launch ATAS
- Download the latest release of ATAS here
- Using Terminal, navigate to folder containing ATAS
- Maximise the screen size of terminal
Test Case: java -jar atas-2.0.0.jar
Expected Output: ATAS startup screen is displayed
Exit ATAS
Test Case: exit
Expected Output: ATAS program terminates
6.5.2 Adding assignment task type
Prerequisites: Issue list command, there are no tasks in the list
Test Case 1: assignment n/assignment one m/cs2113 d/01/05/20 1200 c/No comments
Expected Output: A success message of adding the assignment task will be shown. Entering a list command will show 1
task in the list.
Test Case 2: assignment n/assignment one m/cs2113 d/01/05/20 1200 c/No comments after running the assignment command as stated above
Expected Output: An error message indicating that task already exist will be shown. Issuing a list command will only
show 1 assignment task in the list.
Test Case 3: assignment n/assignment two
Expected Output: An error message indicating that a wrong format of assignment command is issued. list command will
not show assignment two on the list.
Test Case 4: assignment n/assignment three m/cs2113 d/01/05/20 12:00 c/No comment
Expected Output: An error message indicating a wrong format of assignment command is issued. This is due to : in the
time entered.
Test Case 5: assignment n/assignment four m/cs2113 d/40/40/20 1200 c/No comment
Expected Output: An error message indicating a wrong format of date or invalid date is issued. list command will not
show assignment four on the list.
Prerequisites: Prepare today’s date in DD/MM/YY format to enter into d/
Test Case 6:
assignment n/assignment three m/cs2113 d/DD/MM/YY 1200 c/No commentexitjava -jar atas-2.0.0.jar
Expected Output: assignment three will be displayed when ATAS is started.
6.5.3 Adding event task type
Test Case 1: event n/meeting one l/com2 d/01/05/20 1200 - 1400 c/No comment
Expected Output: A success message of adding the event task will be shown. Entering a list command will show the
meeting one on the list.
Test Case 2: event n/meeting one l/com2 d/01/05/20 1200 - 1400 c/No comment after running the event command as stated above
Expected Output: An error message indicating that task already exist will be shown. Issuing a list command will not show
another meeting one on the list.
Test Case 3: event n/meeting two
Expected Output: An error message indicating that a wrong format of event command is issued. list command will
not show meeting two on the list.
Test Case 4: event n/meeting three l/com2 d/01/05/20 12:00-1300 c/none
Expected Output: An error message indicating a wrong format of event command is issued. This is due to : in the
time entered.
Test Case 5: event n/meeting three l/com2 d/40/40/20 1200-1300 c/none
Expected Output: An error message indicating a wrong format of date or invalid date is issued. list command will not
show meeting three on the list.
Test Case 6: event n/meeting four l/com2 d/01/05/20 1300-1200 c/none
Expected Output: An error message indicating that the end time should come after the start time. list command will not
show meeting four on the list.
Prerequisites: Prepare today’s date in DD/MM/YY format to enter into d/
Test Case 7:
event n/meeting four l/com2 d/DD/MM/YY 1200-1300 c/Noneexitjava -jar atas-2.0.0.jar
Expected Output: meeting four will be displayed when ATAS is started.
6.5.4 Setting an event task to repeat
Prerequisite:
- List of tasks contain both
assignmentandeventtasks - In this test case,
eventtask is listed in index1in the list - In this test case,
assignmenttask is listed in index2in the list
Note: Index of tasks may vary depending on order of adding task.
[A] represents anassignmenttask type.
[E] represents aneventtask type.
Test Case 1: repeat id/1 p/3d
Expected Output: Success message indicating that event message will repeat every 3 days. Issuing a list command will
show that event changed to a repeat event task type with [R] to indicate repeat and [3d] to indicate 3 days.
Test Case 2: repeat id/1 p/0
Expected Output: Success message indicating that repeat event will no longer repeat. Issuing a list command will
show that repeat event is changed to event task type.
Test Case 3: repeat id/1 p/3a
Expected Output: An error message indicating wrong format of repeat command is entered.
Test Case 4: repeat id/2 p/3d
Expected Output: An error message indicating that chosen task index is an assignment task. repeat command only works
for event task types.
Prerequisite: List of task is not more than 10
Test Case 5: repeat id/20 p/3d
Expected Output: An error message indicating the valid range of task index to enter will be displayed.
6.5.5 Listing Tasks
Prerequisite: List is empty
Test Case 1: list
Test Case 2: list incomplete assignments
Test Case 3: list upcoming events
Test Case 4: list today
Test Case 5: list week
Expected Output: A message indicating that no tasks were found on the list.
Prerequisite:
- List should contain several
assignment,eventandrepeat eventtask types - List should contain several
assignment,eventandrepeat eventtask types occurring on the current date - List should contain several
eventandrepeat eventtask types that are occurring in the next week - List should contain several
assignmenttask type that are incomplete
Test Case 6: list
Expected Output: All tasks that are entered into ATAS will be shown in the order in which they are entered.
Note: This command lists all tasks on the list
Test Case 7: list today
Expected Output: All tasks that are occurring on current date will be displayed.
Test Case 8: list week
Expected Output: All tasks that are occurring within the current date and one week from current date will be displayed.
Test Case 9: list upcoming events
Expected Output: All event and repeat event task types that are occurring from the current date and time will be displayed.
Test Case 10: list incomplete assignments
Expected Output: All assignment task types that are incomplete will be displayed.
6.5.6 Editing Tasks
Prerequisite:
- List should contain several
assignment,eventandrepeat eventtask types - In this test case, it is assumed that task list has no more than 100 tasks
- It is assumed that index
1contains anassignmenttask type - It is assumed that index
2contains aneventtask type - It is assumed that index
3contains arepeat eventtask type
Test Case 1:
edit 1assignment n/edited assignment one m/cs2113 d/01/05/20 1202 c/No comments
Expected Output: Success message indicating that assignment task is successfully edited is displayed. list command
shows the newly edited assignment task.
Test Case 2:
edit 2event n/edited meeting l/com2 d/01/05/20 1202 - 1402 c/No comment
Expected Output: Success message indicating that event task is successfully edited is displayed. list command shows
the newly edited event task.
Note: Any error in entering
assignmentandeventtypes will result in same error as addingassignmentoreventtask type.
Test Case 3:
edit 3event n/edited repeat meeting l/com2 d/01/05/20 1200 - 1400 c/No comment
Expected Output: Success message indicating that repeat event task is successfully edited is displayed. list command shows
the newly edited repeat event task. Task will retain [R] to indicate that it is still a repeat event task.
Test Case 4: edit 200
Expected Output: An error message indicating the range of valid task numbers.
Test Case 5:
edit 1event n/editing event as assignment l/com2 d/01/05/20 1200 - 1400 c/No comment
Expected Output: An error message indicating that newly edited task should have the same task type as task selected to be edited.
Test Case 6:
edit 2assignment n/editing assignment as event one m/cs2113 d/01/05/20 1202 c/No comments
Expected Output: An error message indicating that newly edited task should have the same task type as task selected to be edited.
6.5.7 Marking Task as Done
Prerequisite:
- List should contain several
assignment,eventandrepeat eventtask types - In this test case, it is assumed that task list has no more than 100 tasks
Test Case 1: done 1
Expected Output: A success message indicating the name of task that is marked done will be displayed. Issuing a list
command shows that the task marked done will be indicated with [/].
Test Case 2: done 200
Expected Output: An error message indicating the range of valid task numbers.
6.5.8 Deleting Task
Prerequisite:
- List should contain several
assignment,eventandrepeat eventtask types - In this test case, it is assumed that task list has no more than 100 tasks
Test Case 1: delete 1
Expected Output: A success message indicating the name of task that is deleted will be displayed. Issuing a list
command shows that the task is deleted.
Test Case 2: delete 200
Expected Output: An error message indicating the range of valid task numbers.
6.5.9 Clearing Task
Prerequisite:
- List should contain several
assignment,eventandrepeat eventtask types - In this test case, it is assumed that task list has no more than 100 tasks
- List should contain several
assignment,eventandrepeat eventtask types that are marked as done
Test Case 1: clear done
Expected Output: A success message indicating that all done tasks are cleared will be displayed. Issuing a list command
shows that there are no done tasks in the list. All tasks should have a [x] indicator.
Test Case 2:
- Issued after above command
clear done
Expected Output: An error message indicating that there are no done tasks at the moment is displayed.
Test Case 3: clear all
Expected Output: A success message indicating that all tasks are cleared will be displayed. Issuing a list command
gives a no task is found error because there are no tasks on the list.
Test Case 4:
- Issued after above command
clear all
Expected Output: An error message indicating there are no tasks at the moment is displayed.
6.5.10 Searching for Tasks
Prerequisite:
- List should contain several
assignment,eventandrepeat eventtask types - It is assumed that there is an
assignmenttask type namedassignment onein the list - It is assumed that there is an
assignmenttask type scheduled on the01/05/20in the list - It is assumed that there is an
eventtask type namedmeeting onein the list - It is assumed that there is an
eventtask type scheduled on the01/05/20in the list
Test Case 1: search t/assignment n/one
Expected Output: Success message showing the searched assignment task type will be displayed.
Test Case 2: search t/event n/one
Expected Output: Success message showing the searched event task type will be displayed.
Note: Search for tasks is case-insensitive.
search t/event n/Oneis a valid search
Test Case 3: search t/anything n/one
Expected Output: Error message displaying invalid search command format will be displayed.
Test Case 4: search t/assignment n/two
Expected Output: An error message showing that there is no matching task for the search query is shown.
Test Case 4: searchd t/assignment n/one d/01/05/20
Expected Output: Success message showing the searched assignment task type will be displayed.
Test Case 5: searchd t/event n/one d/01/05/20
Expected Output: Success message showing the searched event task type will be displayed.
Test Case 6 : search t/all n/one
Expected Output: Success message showing all the tasks matching the search query will be displayed
Test Case 7 : searchd t/all n/one d/01/05/20
Expected Output: Success message showing all the tasks matching the search query and date will be displayed
Test Case 8: search t/assignment n/one d/02/05/20
Expected Output: An error message showing that there is no matching task for the search query is shown.
6.5.11 Calendar View
Prerequisites:
- List should contain several
assignment,eventandrepeat eventtask types - Assume that list is populated with the above task types in the month of May
Test Case 1: calendar d/05/20
Expected Output: Calendar view of all tasks scheduled in May 2020 will be displayed.
Test Case 2: calendar 05/20
Expected Output: Error message indicating that incorrect calendar command is entered will be displayed.